Introduction
下一步想要用 Copilot 做幾件事
-
寫一個 data crawler 從 Geekbench 抓 (static) webpage in html. 我想先以 benchmark 網站例如: Geekbench (CPU), GFXbench (GPU), Antutu (Overall), Ethz (NPU) 爲主。
-
抓來的 html 用 BeautifulSoup parsing 需要的 content
-
BeatifulSoup parsed content 再用 regular expression 取出 structured data
-
Structured data 放入 database
-
database 可以 query and output formatted data
當然是用 Python 做爲 programming language
Step 1 & 2: Data Crawler and HTML Parsing
參考:[@weiyuanDataCrawler2016] and [@oxxoWebCrawler2021]
資料爬蟲是用在沒有以檔案或是 API 釋出資料集的情況下。這個時候就只能捲起袖子,自己想要的資料自己爬!
第一類比較簡單,是靜態網頁
靜態網頁
所謂的靜態網頁,表示網頁是在 Server-side 就已經產生回來的,所以你看的網頁上的資料是固定的(除非重新要求 Server-side)。這樣時候,我們可以來解析一下那資料,網頁,瀏覽器,是怎麼被串起來的呢?一般來說流程是這樣:
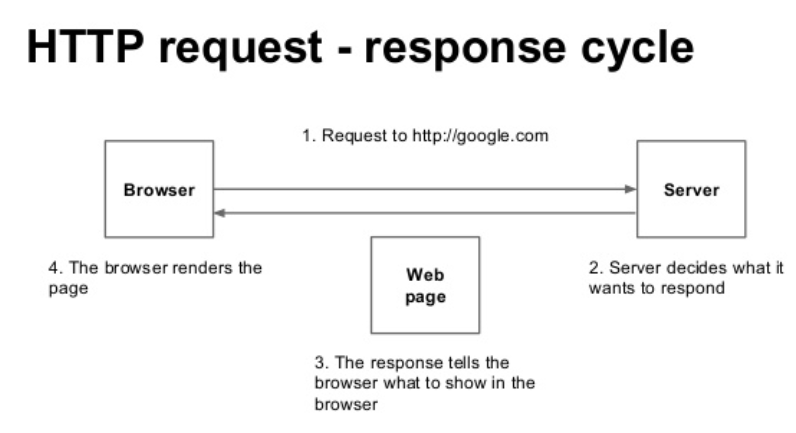
- 使用者(Client-side)發出請求,稱為是 Request。
- 伺服器(Server-side)收到請求,根據請求處理後回應,稱為是 Response。
- 產生的回應如果是純資料的話,屬於 API 的一種;如果是網頁的話,就會回傳一個包含 HTML 標籤的網頁格式。
- 瀏覽器接收包含 HTML 標籤的網頁格式,呈現網頁給使用者。
以上就是一個網頁形成及溝通的過程。網路爬蟲,簡單來說,就是模擬使用者的行為,把資料做一個攔截的動作。基本上可以簡化為:
- [模擬 Request] -> [攔截 Response] -> [從 Response 整理資料] -> [done!]
CoPilot for Data Crawler and Html Parse
Input: create a data crawler to crawl the data from a static website and save the data to a local file.
The default weblink 是極客學院。The data crawler works!
- Request 成功並且回傳 html
-
這裏是用 beautifulsoup4 (bs4) 用來 parse html. bs4 在 anaconda 環境是 default, 不需要另外 install.
-
Title 是 “脚本開發中的 3D 數學”
- Link 有 extract 出 html 所有的 links.
大約花了 1 小時。
# create a data crawler to crawl the data from a static website
# and save the data to a local file

import requests
from bs4 import BeautifulSoup
import os
import re
import time
import random

# get the html content of the website
def get_html(url):
    try:
        r = requests.get(url, timeout=30)
        r.raise_for_status()
        r.encoding = r.apparent_encoding
        return r.text
    except:
        return "Error"

# get the title of the website
def get_title(html):
    soup = BeautifulSoup(html, 'html.parser')
    title = soup.find('title').text
    return title

# get the content of the website
def get_content(html):
    soup = BeautifulSoup(html, 'html.parser')
    content = soup.find('div', class_ = 'content')
    return content

# get the links of the website
def get_links(html):
    soup = BeautifulSoup(html, 'html.parser')
    links = soup.find_all('a', href = re.compile(r'^/'))
    return links

# save the data to a local file
def save_data(url, title, content):
    path = 'data/'
    if not os.path.exists(path):
        os.mkdir(path)
    with open(path + title + '.txt', 'w', encoding = 'utf-8') as f:
        f.write(url + '')
        f.write(title + '')
        if content:
            f.write(content.text)

# main function
def main():
    url = 'http://www.jikexueyuan.com/course/494.html'
    html = get_html(url)
    title = get_title(html)
    content = get_content(html)
    save_data(url, title, content)
    links = get_links(html)
    for link in links:
        print(link)
        time.sleep(random.random() * 5)

if __name__ == '__main__':
    main()
接著我把 weblink 改成 geekbench android single core (SC) benchmark. 基本 ok, 有一些小修改:
- url = ‘https://browser.geekbench.com/android-benchmarks’
- title 可能無法直接作爲 file name 因爲其中包含 space, \n, etc. 所以我加了 process_title to replace special characters to underscore.
1 | |
HTML 資料整理
參考:[@jPythonCrawler2019] and [@fishYahooShopping2018]
從 HTML 標前中整理資料的行為叫做 Parse HTML,所使用的工具稱為 HTMLParser ,在 Python 主流是 BeautifulSoup 這套。BeautifulSoup 會把資料處理後存在變數。接下來可以使用一些函式,把想要值取出來。以下幾個是官方列出來常見的用法,細節可以看這邊。
基本的 search, find functions
find: return ?
Find_all: return ?
基本的取值 function
-
string:用來獲取目標路徑下第一個非標籤字元串,得到的是個字元串 (string)
-
strings:用來獲取目標路徑下所有的子孫非標籤字元串,返回的是個生成器 (generator)
-
stripped_strings:用來獲取目標路徑下所有的子孫非標籤字元串,會自動去掉空白字元串,返回的是一個生成器
-
get_text:用來獲取目標路徑下的子孫字元串,返回的是字元串(包含HTML的格式內容)
-
text:用來獲取目標路徑下的子孫非標籤字元串,返回的是字元串
這裡補充說明一下,如果獲取到的是生成器,一般都是把它轉換成list,不然你看不出那是什麼玩意
另外我找到一個非常有用的 HTML Online Viewer, 可以 expand/collapse html 對於看清楚結構非常有用!HTML Online Viewer
後來發覺 Chorme 本身的 inspect 就非常厲害。[@fishYahooShopping2018]
Geekbench HTML
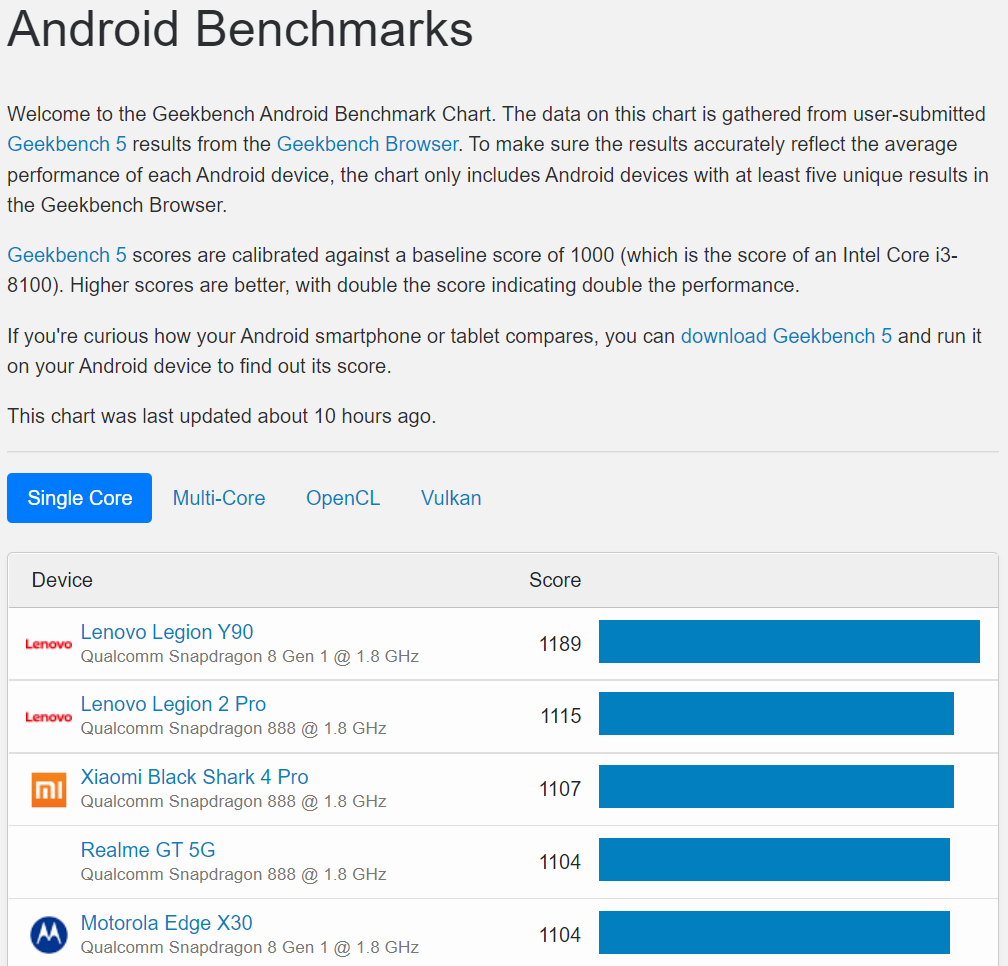
Geekbench website Geekbench 5 - Cross-Platform Benchmark -> Browser -> Benchmark Charts -> Android Benchmark Chart. 基本看起來如下圖:
Geekbench Html 的結構如下:
1 | |
所以順序是
- Use BeautifulSoup to find <head> tag and exatract the title
- Use BeautifulSoup to find
tag and exatract the title - Use BeautifulSoup to find <tbody> tag and exatract the Single-Core device and score
- Use BeautifulSoup to find <tbody> tag and exatract the Multi-Core device and score
- Use BeautifulSoup to find <tbody> tag and exatract the OpenCL device and score
- Use BeautifulSoup to find <tbody> tag and exatract the Vulkan device and score
1 | |
Step 4: 透過 Python 將資料存入 SQLite
參考:[@fishPythonSQLite2018]
很多時候我們會有資料儲存的需求,但又不想花過多的時間在安裝資料庫及種種繁瑣的設定,此時就可以考慮使用 SQLite. Python 內置 SQLite 非常方便。 SQLite 是一種 RDBMS (Relational DataBase Management System). 使用 SQL (Structured Query Language) 作爲溝通的 interface.
RDBMS 的結構 db $\to$ tables $\to$ fields $\to$ records
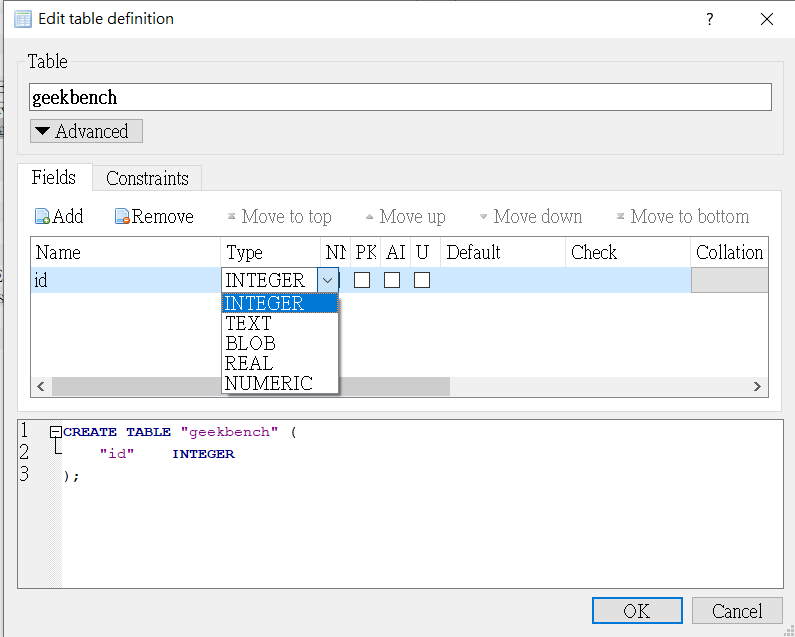
1. 使用 DB Browser for SQLite 建立 database

Database: benchmark.db
2. 建立 table
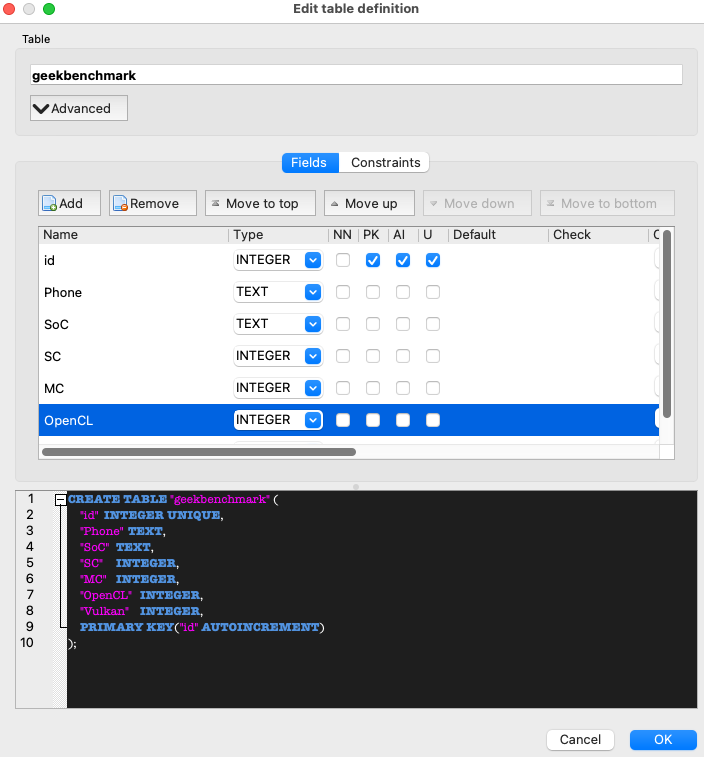
RDBMS 是由一張或多張 excel-like tables 組成。我們可以用 DB Browser create “geekbenchmark” table.
一個 table 包含多個 fields, 一般都會放 id 作爲第一個 field, 並設爲 PK (Primary Key)
Field Type and Attribute
基本 field type 有五種: INTEGER, TEXT, BLOB, REAL, NUMERIC
Real = Float?
How about Date?
Attribute: PK: Primary Key; AI: Auto Increment?; U ?
Field Name
Field Name: id, Phone, SoC, SC, MC, OpenCL, Vulkan
OK -> Write Change to save the database
3. 把爬下來的資料存在 SQLite database (Insert Record)
SQLite 和 MySQL database 的結構和語法基本一樣。好處是 python built-in support to access SQLite database. 第一步是建立 connection and cursor position.
1 | |
一但 connection 建立,接下來就可以直接執行 SQL record insert, update, query, 使用 .execute(“SQL syntax”).
如果要 pass variables, 記得使用 ? in query, 並且 (var1, var2, ), 最後的 “,” 非常重要 (I don’t know why!)
大概就是這樣,ready to go!
SQL 常用語法:
Insert record
1 | |
Update record
1 | |
Query and fetch
1 | |