Windows Subsystem Linux (WSL)
Windows PowerShell 常用 WSL(2) command
目前 Windows 10 supports Ubuntu 18.04 LTS 和 Ubuntu 20.04 LTS
Install and Uninstall WSL (from Windows)
[@hucHowInstall2022] and [@hucHowUninstall2022]
Check WSL status (from Windows)
1 | |
可以看到 WSL distribution name (U18 or U20) 和 WSL version number (WSL1 or WSL2).
-
目前正在執行 (running) 的 U18 WSL2 and U20 WSL2
-
兩個 WSL 都是 WSL2 (version 2)
-
Default active 是 U18 WSL2, 因爲前面有 *.
什麽是 default active? 就是在 “PS> bash” 從 PowerShell 切到 U18 WSL2, 但是仍然在同一個 directory.
Run/Stop WSL (from Windows)
Running: 簡單的方法是直接從 Windows Start Menu 打開 Ubuntu18 or Ubuntu20 icon,就可以把 Stopped WSL2 喚醒。
Stopped: 關掉 Ubuntu windows 不會馬上 Running -> Stopped. 但是等 30 秒就會 Stopped.
1 | |
從 PowerShell 開關 WSL 的方法:
Running -> Stopped
1 | |
全部 stopped
1 | |
Stopped -> Running
1 | |
Stopped -> Running the default WSL: wsl (or bash)
1 | |
PowerShell 和 Ubuntu WSL bash 切換 (Windows <-> Ubuntu)
1 | |
- (Windows) PowerShell 切到 (Default Ubuntu) bash: wsl (or bash)
- (Ubuntu) bash 回到 PowerShell: exit
- Caveat1: bash (or wsl) 會切到 default WSL.
- Caveat2: 切換 PowerShell and bash 都是在同一個 directory. 對於需要用 Linux command 非常方便。
Set a Default Linux Distribution (from Windows)
1 | |
實例如下:
1 | |
Switch between WSL1 and WSL2 (from Windows)
一般我們都用 WSL2:WSL2 是 WSL1 的更新版本,支持所有的 linux system call, 又快了 20%. 沒有什麽理由用 WSL1. Don’t do it!
1 | |
Ubuntu (WSL2) bash 常用 command
確認目前是在哪一個 WSL2 (from Ubuntu)
Ubuntu 20.04:
1 | |
Ubuntu 18.04:
1 | |
How To Upgrade Existing WSL/WSL2 Ubuntu 18.04 to 20.04
How To Upgrade Existing WSL/WSL2 Ubuntu 18.04 to 20.04 - NEXTOFWINDOWS.COM
password is axxxxxxz
1 | |
Then clean up package source and remove any unused packages.
U18/U20
1 | |
Auto Upgrade to New Packages (Not recommend)
It’s important to install this update manager core package this will trick the system to think there is a new LTS available and allow you to do an in place upgrade.
1 | |
1 | |
Install CUDA for AI
Reference: [@dkHowInstall2022]
-
更新win系统 to 2022H2
-
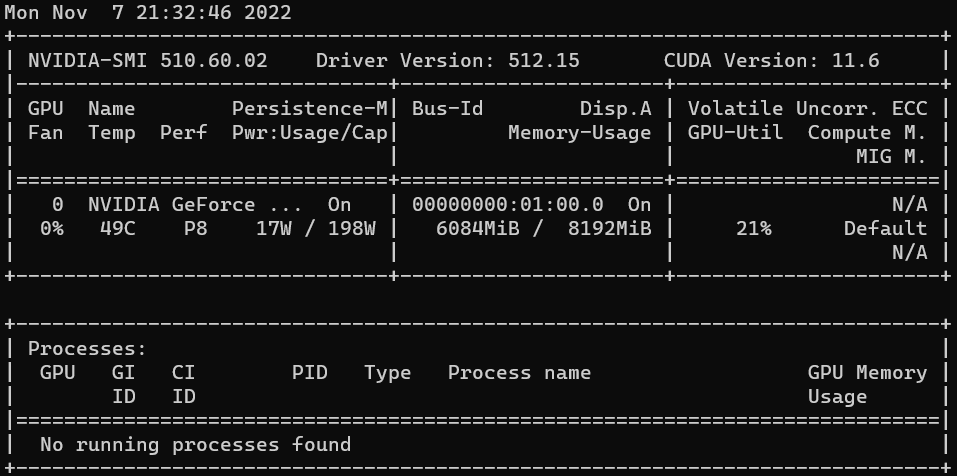
Download Nvidia’s Windows driver (510.60.02) and CUDA (11.6) for graph card and support WSL! Download NVIDIA, GeForce, Quadro, and Tesla Drivers
-
Install WSL2
-
Check if graph card is OK in WSL2: graphic driver (510.60.02) and CUDA (11.6)
upgrade to driver 516.94, CUDA 11.7
1 | |

- Install Anaconda (2022/10, Python 3.9)
1 | |
Clone environment jax and install jax. use the CPU version since not for serious computing!
1 | |
Clone environment torch and install pytorch (use GPU!)
1 | |
Install cudnn (TBD! Nvidia sucks!)
-
Go to nvidia download website: [cuDNN Archive NVIDIA Developer](https://developer.nvidia.com/rdp/cudnn-archive).

Try jax gpu on jax_gpu virtual environment.
PC -> use WSL -> jax cpu (OK), jax gpu (TBD)
Mac -> M1 version jax (NOK!) use miniforge3 (OK)
Compact the Ubuntu VM!
First find the location of the disk:
- PowerShell > diskpart
- DISKPART> Select vdisk file=c:\Users\allen\AppData\Local\Packages\CanonicalGroupLimited.Ubuntu20.04onWindows_79rhkp1fndgsc\LocalState\ext4.vhdx
- DISKPART> compact vdisk
- DISKPART> Select vdisk file=c:\Users\allen\AppData\Local\Packages\CanonicalGroupLimited.Ubuntu18.04onWindows_79rhkp1fndgsc\LocalState\ext4.vhdx
- DISKPART> compact vdisk