Nano GPT

Reference

https://zhuanlan.zhihu.com/p/601044938

Github of Karpathy

Introduction

前文提到 GPT network. 本文用實際的 code example 來說明。我們用 Karpathy 的 nanoGPT 為例。

Karpathy 是 OpenAI 的 cofounder (2015-2017), 前 Tesla AI 總監 (2017 - 2023),李飛飛高徒。2023/1 發佈的NanoGPT,是他2年前 MiniGPT 的升級版。2023/2 Karpathy 再度加入 OpenAI.

據作者介紹,代碼簡單易讀,2個僅300行代碼的檔案。

現已基于OpenWebText重現 GPT-2 (124M),在單個8XA100 40GB節點上,訓練時間為38小時。

OpenAI GPT2 checkpoint 可以得到 GPT baselines 如下 (using OpenWebText dataset):

Model Params Train loss Val Loss
GPT2 124M 3.11 3.12
GPT2-medium 350M 2.85 2.84
GPT2-large 774M 2.66 2.67
GPT2-xl 1558M 2.56 2.54
NanoGPT 10.65M 1.21
莎士比亞 data
1.22
莎士比亞 data
NanoGTP ? 3.11
2.85 w/ finetune
finetuneOpenWebText
3.11
2.85 w/ finetune
finetuneOpenWebText

NanoGPT

發佈檔案裡面包含一個約300行的GPT模型定義(檔案名:model.py),可以選擇從OpenAI加載GPT-2權重。

還有一個訓練模型PyTorch樣板(檔案名:train.py),同樣也是300多行。

作者補充道,代碼並不難,很容易就能滿足大家需求——無論是從頭開始訓練新模型,還是基于預訓練進行微調(目前可用的最大模型為1.3B參數的GPT-2)。

Training

Karpathy 提供 quick start for training the model.

Shakespear Datasets

Default 使用 bfloat16 and pytorch2.0. 我的 GTX-1080 GPU (8GB) 和 driver 不支持 bfloat16 和 CUDAx 所以改成 float32 和 pytorch2 = False.

在 train 3 個小時后 : step 500, val loss: 1.4640

iter 490: loss 1.2073, time 17068.56ms, mfu 0.85% step 500: train loss 1.0899, val loss 1.4640

Karpathy 使用 A100 GPU (40GB) 只用了 3min (60X) 就得到 validation loss: 1.4697.

  • BF16 比 FP32 理論上快了 2X.
  • Pytorch 2.0 比 Pytorch 1.13 快了 1.5X?
  • A100 比 GTX-1080 快了 20X??

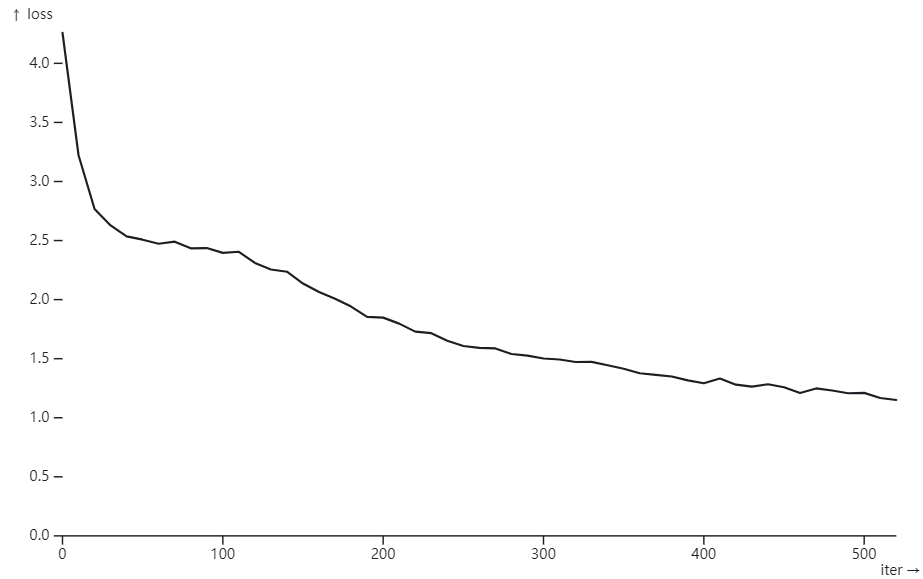
使用 Simon Willison 的 “Plot loss from nanoGPT” Plot loss from nanoGPT / Simon Willison Observable (observablehq.com)

image-20230224224948207

Appendix

Appendix A: Model.py

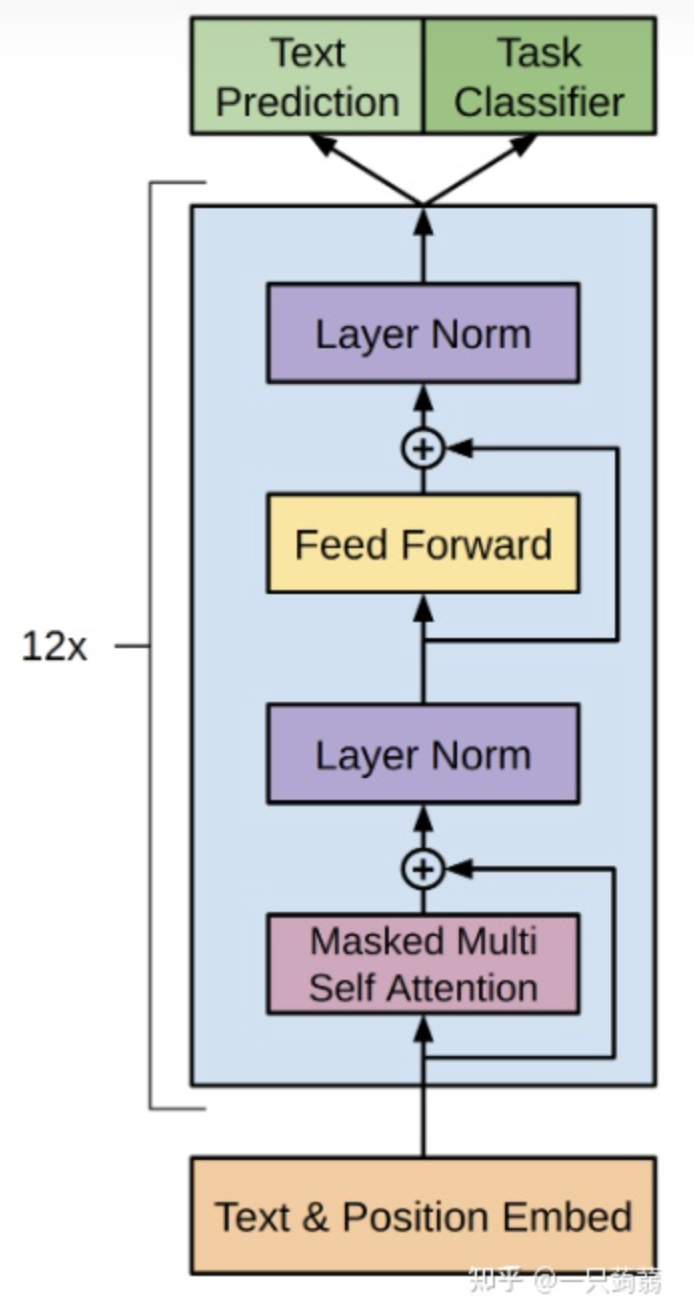
我們先 review GPT 作為 transformer decoder 的 block diagram.

image-20230217232641906

image-20230217232642069

image-20230218235353913

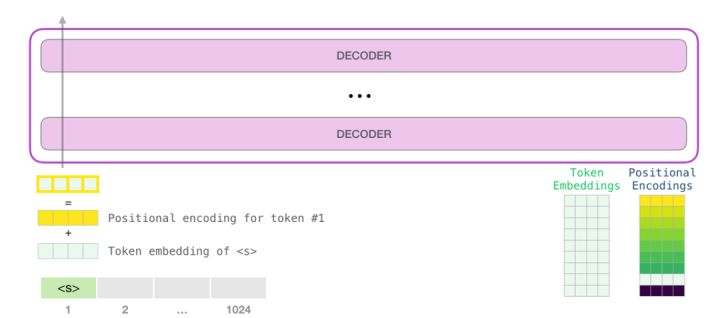
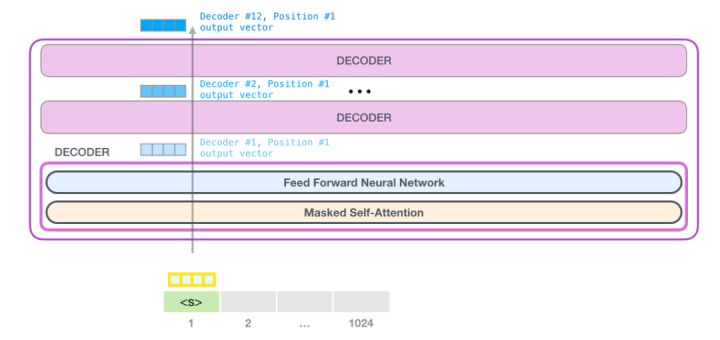
比較詳細的 block diagram:

  • 12 個 stacking decoders
  • 每個 decoder 包含 masked multi-head self attention + layer norm + feed forward + layer norm.

image-20230222222226055

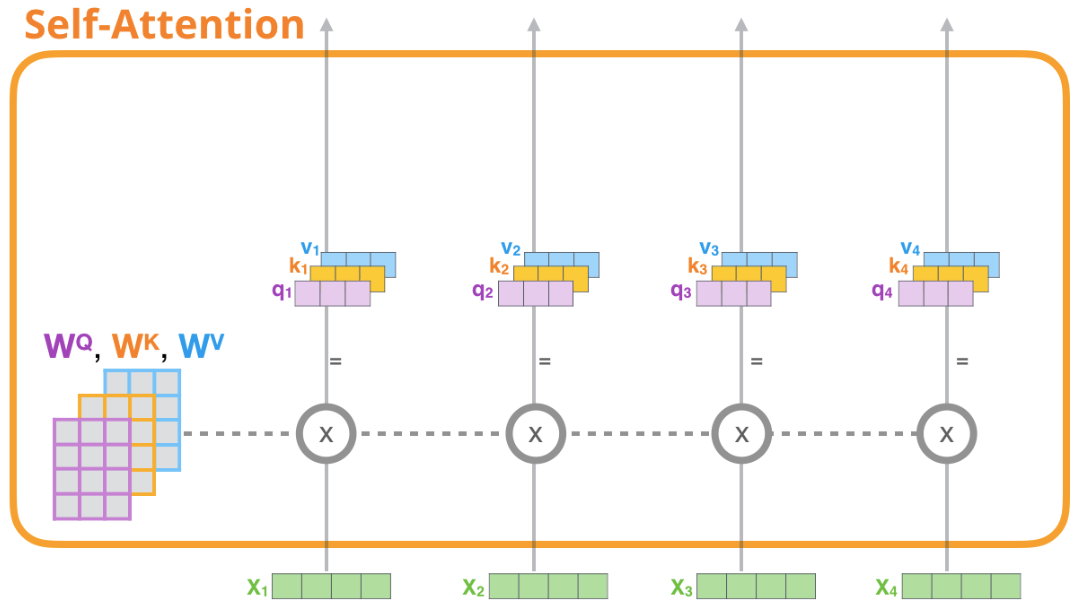
Self Attention Layer

這一部分就是圖中Masked Multi Self Attention的實現,也是transformer中的核心機制。

這裡的multi-head採用的是把Q,K,V切分成n_head份來實現的。

比較有趣的是mask的部分,tril是得到一個矩陣的下三角矩陣,把一個全1的矩陣放進去就可以得到mask矩陣。而register_buffer可以將一個張量註冊為一個buffer。這意味著這個張量不會被計算梯度,也不會對模型的參數進行更新,可以節省內存,提高計算效率。

1
2
3
4
5
6
7
8
9
10
11
12
13
14
15
16
17
18
19
20
21
22
23
24
25
26
27
28
29
30
31
32
33
34
35
36
37
38
39
40
41
42
43
44
45
46
47
48
49
50
51
52
53
54
55
56
57
58
class CausalSelfAttention(nn.Module):

    def __init__(self, config):
        super().__init__()
        # 由於這個代碼使用的是將embedding切分成n_head份實現multi head,
        # 因此需要n_head的大小整除embedding的大小
        assert config.n_embd % config.n_head == 0
        # key, query, value projections for all heads, but in a batch
        self.c_attn = nn.Linear(config.n_embd, 3 * config.n_embd, bias=config.bias)
        # output projection
        self.c_proj = nn.Linear(config.n_embd, config.n_embd, bias=config.bias)
        # regularization 防止過擬合
        self.attn_dropout = nn.Dropout(config.dropout)
        self.resid_dropout = nn.Dropout(config.dropout)
        self.n_head = config.n_head
        self.n_embd = config.n_embd
        self.dropout = config.dropout
        # flash attention make GPU go brrrrr but support is only in PyTorch nightly and still a bit scary
        self.flash = hasattr(torch.nn.functional, 'scaled_dot_product_attention') and self.dropout == 0.0
        if not self.flash:
            print("WARNING: using slow attention. Flash Attention atm needs PyTorch nightly and dropout=0.0")
            # causal mask to ensure that attention is only applied to the left in the input sequence
            # 使用tril得到mask矩陣
            self.register_buffer("bias", torch.tril(torch.ones(config.block_size, config.block_size))
                                        .view(1, 1, config.block_size, config.block_size))

    def forward(self, x):
        # x是一個(batch_size, sequence_length, embedding_dimensionality) 的tensor
        B, T, C = x.size() # batch size, sequence length, embedding dimensionality (n_embd)

        # calculate query, key, values for all heads in batch and move head forward to be the batch dim
        # 把輸入經過線性層得到的矩陣切分,得到qkv三個矩陣
        q, k ,v  = self.c_attn(x).split(self.n_embd, dim=2)
        # 再將k,q,v的embedding分給每個head
        # 矩陣的形狀變化:(batch_size, sequence_length, embedding_dimensionality) 
        # -> (batch_size, n_head, sequence_length, embedding_dimensionality // n_head)
        # k和q負責計算attention score,v是每個token的embedding
        k = k.view(B, T, self.n_head, C // self.n_head).transpose(1, 2) # (B, nh, T, hs)
        q = q.view(B, T, self.n_head, C // self.n_head).transpose(1, 2) # (B, nh, T, hs)
        v = v.view(B, T, self.n_head, C // self.n_head).transpose(1, 2) # (B, nh, T, hs)
				# 計算了每一對token的Q和K的縮放點積,從而得到每對token之間的attention score
        # att矩陣形狀: (batch_size, n_head, sequence_length, sequence_length) 
        # causal self-attention; Self-attend: (B, nh, T, hs) x (B, nh, hs, T) -> (B, nh, T, T)
        if self.flash:
            # efficient attention using Flash Attention CUDA kernels
            y = torch.nn.functional.scaled_dot_product_attention(q, k, v, attn_mask=None, dropout_p=self.dropout, is_causal=True)
        else:
            # manual implementation of attention
            att = (q @ k.transpose(-2, -1)) * (1.0 / math.sqrt(k.size(-1)))
            att = att.masked_fill(self.bias[:,:,:T,:T] == 0, float('-inf'))
            att = F.softmax(att, dim=-1)
            att = self.attn_dropout(att)
            y = att @ v # (B, nh, T, T) x (B, nh, T, hs) -> (B, nh, T, hs)
        y = y.transpose(1, 2).contiguous().view(B, T, C) # re-assemble all head outputs side by side

        # output projection
        y = self.resid_dropout(self.c_proj(y))
        return y

Feed-Forward Layer

Feed Forward的部分,這裡用到了gelu,似乎是一種類似relu但是更強一些的激活函數。

1
2
3
4
5
6
7
8
9
10
11
12
13
14
class MLP(nn.Module):

    def __init__(self, config):
        super().__init__()
        self.c_fc    = nn.Linear(config.n_embd, 4 * config.n_embd, bias=config.bias)
        self.c_proj  = nn.Linear(4 * config.n_embd, config.n_embd, bias=config.bias)
        self.dropout = nn.Dropout(config.dropout)

    def forward(self, x):
        x = self.c_fc(x)
        x = new_gelu(x)
        x = self.c_proj(x)
        x = self.dropout(x)
        return x

一個transformer decoder block的實現,即圖上被藍色包圍的部分

值得一提的是,這裡的實現和圖上有一定區別,圖上是Attention->Layer Norm->Feed Forward->Layer Norm的順序,而這裡實現的是LayerNorm->Attention->LayerNorm->Feed Forward的順序。

這個Block的輸入的shape和輸出的shape都是(batch_size, suquence_length, embedding_dimensionality)

1
2
3
4
5
6
7
8
9
10
11
12
13
class Block(nn.Module):

    def __init__(self, config):
        super().__init__()
        self.ln_1 = LayerNorm(config.n_embd, bias=config.bias)
        self.attn = CausalSelfAttention(config)
        self.ln_2 = LayerNorm(config.n_embd, bias=config.bias)
        self.mlp = MLP(config)

    def forward(self, x):
        x = x + self.attn(self.ln_1(x))
        x = x + self.mlp(self.ln_2(x))
        return x

下面就是GPT模型實現的部分

__init__部分中實現了input和output的embedding的參數共享。

具體來說,wte (text embeddings) 的weight是一個大小為(vocab_size, embedding_size)大小的矩陣,而Linear層 (y = x AT + b) 的weight就是A矩陣,為了實現dimension從in_feature到out_feature的轉換,A矩陣的形狀需要是(out_feature, in_feature),剛好就是shape為(vocab_size, embedding_size)的一個矩陣,所以這裡直接賦值,就是淺拷貝,實現了參數共享。

1
2
3
4
5
6
7
8
9
10
11
12
13
14
15
16
17
18
19
20
21
22
23
24
25
26
27
28
class GPT(nn.Module):

    def __init__(self, config):
        super().__init__()
        assert config.vocab_size is not None
        assert config.block_size is not None
        self.config = config
        # 一個ModuleDict,包含了很多子層
        # wte:word to embedding,把token轉換成embedding
        # wpe:word position embedding,把位置信息轉換成embedding
        # drop:dropout層,防止過擬合
        # h:一個ModuleList,包含了n_layer個Block,實現transformer中的多層的結構
        # ln_f:一個layernorm層,進行歸一化
        self.transformer = nn.ModuleDict(dict(
            wte = nn.Embedding(config.vocab_size, config.n_embd),
            wpe = nn.Embedding(config.block_size, config.n_embd),
            drop = nn.Dropout(config.dropout),
            h = nn.ModuleList([Block(config) for _ in range(config.n_layer)]),
            ln_f = nn.LayerNorm(config.n_embd),
        ))
        self.lm_head = nn.Linear(config.n_embd, config.vocab_size, bias=False)
        # 這裡input和output的embedding使用了參數共享
        self.transformer.wte.weight = self.lm_head.weight # https://paperswithcode.com/method/weight-tying

        # report number of parameters
        n_params = sum(p.numel() for p in self.parameters())
        print("number of parameters: %.2fM" % (n_params/1e6,))
        print("number of parameters: %.2fM" % (n_params/1e6,))

接下來就是GPT class的forward函數,target表示目標輸出的label,根據有沒有傳進來決定要不要計算loss。

x[:, [-1], :]和x[:,-1,:]的區別就是後者會只剩下兩個維度,不保留第二維,但是前者會保留第二維,大小為1。

1
2
3
4
5
6
7
8
9
10
11
12
13
14
15
16
17
18
19
20
21
22
23
24
25
26
27
28
29
    def forward(self, idx, targets=None):
        device = idx.device
        b, t = idx.size()
        assert t <= self.config.block_size, f"Cannot forward sequence of length {t}, block size is only {self.config.block_size}"
        # 得到一個表示位置的tensor,裡面的value是(0, 1, 2, ..., t - 1)
        pos = torch.arange(0, t, dtype=torch.long, device=device).unsqueeze(0) # shape (1, t)

        # forward the GPT model itself
        tok_emb = self.transformer.wte(idx) # token embeddings of shape (b, t, n_embd)
        pos_emb = self.transformer.wpe(pos) # position embeddings of shape (1, t, n_embd)
        # 這個地方雖然兩個tensor形狀不相等,但是因為b是1的倍數,會自動把(1, t, n_embd)進行repeat,得到(b, t, n_embd),加起來
        x = self.transformer.drop(tok_emb + pos_emb)
        # 經過n_layer層block
        for block in self.transformer.h:
            x = block(x)
        x = self.transformer.ln_f(x)

        if targets is not None:
            # 此時,每一個token的embedding都是包括它在內的它之前的token的某種複雜的加權值,
            # 它學習到了這個首碼序列的信息,我們用預測它的下一個token是什麼的這個任務來訓練,
            # 用x中的embedding進行decode,把它映射到vocab中去,就得到了每個首碼序列對下一個token的預測值。
            logits = self.lm_head(x)
            loss = F.cross_entropy(logits.view(-1, logits.size(-1)), targets.view(-1), ignore_index=-1)
        else:
            # 在inference的時候不需要計算loss,只保留最後一個學習到整個句子的信息
            logits = self.lm_head(x[:, [-1], :]) # note: using list [-1] to preserve the time dim
            loss = None

        return logits, loss

下面是generate的實現,生成max_new_tokens長度的文本。

temperature是預測概率的一個超參,通常來說高溫度會使得模型預測的概率分佈更加平均,更加不確定,低溫度會使得模型預測的概率分佈更加偏斜,更加確定。 將 logits[:,-1,:] 除以 temperature 的作用就是將預測概率分佈降溫,使得預測更加不確定,可以生成更加多樣的文本。這個操作可以看成對模型預測的結果加上一些雜訊, 增加生成文本的多樣性。

1
2
3
4
5
6
7
8
9
10
11
12
13
14
15
16
17
18
19
20
21
22
23
24
    @torch.no_grad()
    def generate(self, idx, max_new_tokens, temperature=1.0, top_k=None):
        # 生成max_new_tokens次
        for _ in range(max_new_tokens):
            # 如果目前序列的長度超過了block size,就切割後block size大小的序列來生成,用滑動窗口的方式控制長度
            idx_cond = idx if idx.size(1) <= self.config.block_size else idx[:, -self.config.block_size:]
            # 經過forward函數,得到logits,此時logits的shape是(batch_size, 1, vocab_size)
            logits, _ = self(idx_cond)
            # 加入temperature來處理logits
            logits = logits[:, -1, :] / temperature
            # 只取前topk個
            if top_k is not None:
                # v的大小是(batch_size, min(top_l, logits.size(-1))),保存的是從大到小的topk個值
                v, _ = torch.topk(logits, min(top_k, logits.size(-1)))
                # 將小於topk的都賦值為-inf,使得它們在softmax之後為0
                logits[logits < v[:, [-1]]] = -float('Inf')
            # apply softmax to convert logits to (normalized) probabilities
            probs = F.softmax(logits, dim=-1)
            # multinomial函數是用probs作為採樣概率,採樣num_samples個,返回下標,在這裡就是根據概率對所有batch採樣出來
            idx_next = torch.multinomial(probs, num_samples=1)
            # 把生成出來的這個加到序列後面,繼續生成
            idx = torch.cat((idx, idx_next), dim=1)

        return idx

下面是from_pretrained的代碼,從huggingface的GPT模型中加載weight。

這裡比較有意思的是對一個tensor進行copy_的操作也會被記錄在計算圖上,因此需要使用with torch.no_grad()

1
2
3
4
5
6
7
8
9
10
11
12
13
14
15
16
17
18
19
20
21
22
23
24
25
26
27
28
29
30
31
32
33
34
35
36
37
38
39
40
41
42
43
44
45
46
47
48
49
50
51
    # classmethod表示這是一個類方法,可以通過類名調用,而不用實例化類
    @classmethod
    def from_pretrained(cls, model_type, override_args=None):
        assert model_type in {'gpt2', 'gpt2-medium', 'gpt2-large', 'gpt2-xl'}
        override_args = override_args or {} # default to empty dict
        # 保證傳進來的override_args都是dropout
        assert all(k == 'dropout' for k in override_args)
        from transformers import GPT2LMHeadModel
        print("loading weights from pretrained gpt: %s" % model_type)

        # 在這個dict里根據model_type選擇需要的type對應的參數
        config_args = {
            'gpt2':         dict(n_layer=12, n_head=12, n_embd=768),  # 124M params
            'gpt2-medium':  dict(n_layer=24, n_head=16, n_embd=1024), # 350M params
            'gpt2-large':   dict(n_layer=36, n_head=20, n_embd=1280), # 774M params
            'gpt2-xl':      dict(n_layer=48, n_head=25, n_embd=1600), # 1558M params
        }[model_type]
        # 判斷是否有dropout的override參數,如果有就更新config_args裡的dropout值
        if 'dropout' in override_args:
            config_args['dropout'] = override_args['dropout']

        # 初始化GPTConfig類,block_size固定為1024,其他參數用config_args來填充
        config = GPTConfig(block_size=1024, **config_args)
        # 創建GPT類的實例,參數用config來填充
        model = GPT(config)
        # 得到我們自己寫的這個GPT模型的所有參數
        sd = model.state_dict()

        # 初始化huggingface的模型
        model_hf = GPT2LMHeadModel.from_pretrained(model_type)
        sd_hf = model_hf.state_dict()

        # 拿出需要copy的參數的key
        keys = [k for k in sd_hf if not k.endswith('attn.masked_bias')] # ignore these
        # openai的實現裡有一些Linear用了Conv1D,導致了weight和我們使用的相比是轉置的,把這一部分特別提取出來
        transposed = ['attn.c_attn.weight', 'attn.c_proj.weight', 'mlp.c_fc.weight', 'mlp.c_proj.weight']
        assert len(keys) == len(sd)
        for k in keys:
            # 如果k是w中某個字元串尾碼,那麼就copy它的轉置
            # endswith是判斷某個字元串是不是尾碼,tensor.t()是矩陣的轉置,
            if any(k.endswith(w) for w in transposed):
                assert sd_hf[k].shape[::-1] == sd[k].shape
                with torch.no_grad():
                    sd[k].copy_(sd_hf[k].t())
            # 否則就直接copy
            else:
                assert sd_hf[k].shape == sd[k].shape
                with torch.no_grad():
                    sd[k].copy_(sd_hf[k])

        return model

下面的代碼用來配置並返回optimizer,指定在一些權重上衰減或者不衰減。

權重衰減(weight decay)是一種正則化技巧,主要用於防止過擬合。在訓練過程中,權重衰減會使得模型的權重變得更小,從而減少模型的複雜度。

在這個代碼中,作者將模型中的參數分為兩組,一組是需要權重衰減的參數,另一組是不需要權重衰減的參數。參數的分組依據是:

  • 偏置項(bias)參數不需要權重衰減,因為偏置項不參與計算,而且往往很小,所以不需要權重衰減來降低其複雜度。
  • 層歸一化(LayerNorm)權重參數也不需要權重衰減,因為它的作用是對輸入數據進行標準化,不會對模型的複雜度產生影響。
  • 嵌入(Embedding)參數也不需要權重衰減,因為權重衰減可能會抹除詞向量之間的關係,從而降低模型的性能。
  • 其它權重參數需要權重衰減。
1
2
3
4
5
6
7
8
9
10
11
12
13
14
15
16
17
18
19
20
21
22
23
24
25
26
27
28
29
30
31
32
33
34
35
36
37
38
39
40
41
42
    def configure_optimizers(self, weight_decay, learning_rate, betas):

        # 用兩個set保存衰減的和不衰減的參數
        decay = set()
        no_decay = set()
        # 保存需要權重衰減和不權重衰減的模組,可以發現我們模型只用到了Linear,LayerNorm和Embedding三個基本模組
        whitelist_weight_modules = (torch.nn.Linear, )
        blacklist_weight_modules = (torch.nn.LayerNorm, torch.nn.Embedding)
        # 枚舉所有模組,對於每一個模組mn和m,枚舉它的參數,對於每一個參數pn和p,判斷它是否需要權重衰減。
        for mn, m in self.named_modules():
            for pn, p in m.named_parameters():
                fpn = '%s.%s' % (mn, pn) if mn else pn # full param name
                # 這個地方因為一個module裡可能包含另一個,所以很多parameter會重複出現,但是我們在下面只考慮一些固定的組合
                # ps:其實我覺得這個地方module不屬於指定的可以continue的,因此所有的參數一定來源於上面三個模組中
                # 如果參數名以“bias”結尾,則不需要權重衰減。
                if pn.endswith('bias'):
                    no_decay.add(fpn)
                # 如果參數名以“weight”結尾且所屬模組是白名單中的模組,則需要權重衰減。
                elif pn.endswith('weight') and isinstance(m, whitelist_weight_modules):
                    decay.add(fpn)
                # 如果參數名以“weight”結尾且所屬模組是黑名單中的模組,則不需要權重衰減。
                elif pn.endswith('weight') and isinstance(m, blacklist_weight_modules):
                    no_decay.add(fpn)

        # 由於在訓練過程中,'transformer.wte.weight'和'lm_head.weight'是綁定的,所以會將兩個參數都加入no_decay和decay集合中,因此需要手動將'lm_head.weight'從decay集合中去除
        decay.remove('lm_head.weight')

        # 使用交集和並集校驗是否考慮了每個參數
        param_dict = {pn: p for pn, p in self.named_parameters()}
        inter_params = decay & no_decay
        union_params = decay | no_decay
        assert len(inter_params) == 0, "parameters %s made it into both decay/no_decay sets!" % (str(inter_params), )
        assert len(param_dict.keys() - union_params) == 0, "parameters %s were not separated into either decay/no_decay set!" \
                                                    % (str(param_dict.keys() - union_params), )

        # 生成pytorch optimizer
        optim_groups = [
            {"params": [param_dict[pn] for pn in sorted(list(decay))], "weight_decay": weight_decay},
            {"params": [param_dict[pn] for pn in sorted(list(no_decay))], "weight_decay": 0.0},
        ]
        optimizer = torch.optim.AdamW(optim_groups, lr=learning_rate, betas=betas)
        return optimizer

下面的代碼是減少block size的,因為from pretrained的GPT預設block size為1024,這個函數可以減少block size,目前的block size只在self attention的mask矩陣bias,wpe中用到,所以只用改這幾個位置。

1
2
3
4
5
6
    def crop_block_size(self, block_size):
        assert block_size <= self.config.block_size
        self.config.block_size = block_size
        self.transformer.wpe.weight = nn.Parameter(self.transformer.wpe.weight[:block_size])
        for block in self.transformer.h:
            block.attn.bias = block.attn.bias[:,:,:block_size,:block_size]

Appendix B: Train.py

train.py沒有明顯的模組,我按照功能把代碼聚集到一起來寫。

下面這一塊是log相關的部分,代碼中用到的工具是wandb,一個類似tensorboard的可視化工具,使用的方法就是用init初始化project,把需要記錄的log用log的函數記錄。

1
2
3
4
5
6
7
8
9
10
11
if wandb_log and master_process:
    import wandb
    wandb.init(project=wandb_project, name=wandb_run_name, config=config)
...
        if wandb_log:
            wandb.log({
                "iter": iter_num,
                "train/loss": losses['train'],
                "val/loss": losses['val'],
                "lr": lr,
            })

這一部分是分散式訓練的相關代碼,用到了DDP來實現

STEP 1:這裡用到了RANK和LOCAL_RANK這兩個環境變數,在DDP中,會給多進程中的每個進程分配獨特的rank和local rank值。rank表示當前進程在分散式集群中的進程編號(就是說不是系統的pid,而是對當前這個程序的所有進程編號),而local_rank表示當前進程在當前機器上的編號。(這裡提一下環境變數,每個進程有自己獨立的環境變數,在創建的時候都繼承了全局環境變數和父進程環境變數)這樣設置rank和local rank的目的是為了讓每個進程能夠知道自己在分散式集群中的位置,方便在分散式訓練中進行通信和同步。

1
2
3
4
5
6
7
8
9
10
11
12
13
14
15
16
17
18
19
from torch.nn.parallel import DistributedDataParallel as DDP
# 得到RANK環境變數的值,如果沒有就是-1,說明沒有使用分散式訓練
ddp = int(os.environ.get('RANK', -1)) != -1 # is this a ddp run?
if ddp:
    # 初始化分散式環境,init_process_group接收一個可選的參數backend,這裡是nccl
    # 這個函數會在所有的進程中調用,它會啟動一個主進程來管理整個進程組。
    init_process_group(backend=backend)
    ddp_rank = int(os.environ['RANK'])
    ddp_local_rank = int(os.environ['LOCAL_RANK'])
    # 根絶local rank這個在當前設備上的編號確定該用哪個GPU
    device = f'cuda:{ddp_local_rank}'
    # 判斷是不是主進程,主進程會執行logging和checkpointing等操作
    master_process = ddp_rank == 0 # this process will do logging, checkpointing etc.
    # 每個進程設置不同的seed來保證訓練的隨機性
    seed_offset = ddp_rank # each process gets a different seed
else:
    # 如果不是分散式訓練,那麼當前進程就是主進程,seed_offset設置為0.
    master_process = True
    seed_offset = 0

STEP 2:把model放到DDP容器裡去

1
2
if ddp:
    model = DDP(model, device_ids=[ddp_local_rank])

STEP 3:在訓練的時候如果使用了ddp,現在model是一個container,裡面的module才是我們的模型

1
        raw_model = model.module if ddp else model

STEP 4:在訓練中,只需要在最後一個微步中同步梯度。官方的做法是使用model.no_sync()上下文管理器,但是這段代碼直接設置了model.require_backward_grad_sync變數,當micro_step等於gradient_accumulation_steps-1時,需要同步梯度。

        if ddp:
            model.require_backward_grad_sync = (micro_step == gradient_accumulation_steps - 1)

STEP 5:最後,調用了destroy_process_group()來銷毀進程組

if ddp:
    destroy_process_group()

除此之外,如果是當前的process是master_process,還需要執行創建output dir,初始化wandb,記錄log,計算loss,保存checkpoint。

下面這些是混合精度計算的部分。

nullcontext() 是 PyTorch 的一個函數,用於在 CPU 上運行程序時返回一個空的上下文。這樣做的目的是為了避免在 CPU 上使用 autocast 函數導致的額外計算負擔。

torch.amp.autocast 函數是 PyTorch 的一個自動混合精度計算函數。它可以在運行時自動地切換數據類型,以便在需要時使用高精度,並在不需要時使用低精度。這可以提高程序的運行效率。

1
2
3
4
5
6
7
8
9
10
11
# bfloat16 比 float16 更加緊湊
dtype = 'bfloat16' # 'float32' or 'bfloat16'
# 允許在矩陣乘法(matmul)上使用 Tensor Core(tf32)
torch.backends.cuda.matmul.allow_tf32 = True # allow tf32 on matmul
# 允許在 CUDA 動態神經網絡庫(CuDNN)上使用 Tensor Core(tf32)
torch.backends.cudnn.allow_tf32 = True # allow tf32 on cudnn
# 根據 dtype 參數的值設置 PyTorch 的數據類型。
ptdtype = {'float32': torch.float32, 'bfloat16': torch.bfloat16}[dtype]
# 如果程序正在運行在 CPU 上,那麼使用 nullcontext();如果程序正在運行在 GPU 上,
# 那麼使用 torch.amp.autocast 函數,並設置相應的設備類型和數據類型。
ctx = nullcontext() if device_type == 'cpu' else torch.amp.autocast(device_type=device_type, dtype=ptdtype)

下面是初始化模型的部分

1
2
3
4
5
6
7
8
9
10
11
12
13
14
15
16
17
18
19
20
21
22
23
24
25
26
27
28
29
30
31
32
33
34
35
36
37
38
39
40
41
42
model_args = dict(n_layer = n_layer, n_head = n_head, n_embd = n_embd, block_size = block_size, dropout = dropout, vocab_size = vocab_size)
# 新建一個模型
if init_from == 'scratch':
    print("Initializing a new model from scratch")
    gptconf = GPTConfig(**model_args)
    model = GPT(gptconf)
# 從checkpoint中恢復模型
elif init_from == 'resume':
    print(f"Resuming training from {out_dir}")
    ckpt_path = os.path.join(out_dir, 'ckpt.pt')
    checkpoint = torch.load(ckpt_path, map_location=device)
    checkpoint_model_args = checkpoint['model_args']
    # 判斷一下checkpoint裡存的和我們現在這個是不是匹配的
    for k, v in model_args.items():
        assert checkpoint_model_args[k] == v, "for now"
    gptconf = GPTConfig(**model_args)
    model = GPT(gptconf)
    state_dict = checkpoint['model']
    # 這段代碼是在修復checkpoint中的state_dict的key。
    # 在某些情況下,state_dict的key會帶有一個"_orig_mod."的首碼,
    # 這段代碼就是在遍歷state_dict的所有鍵值對,如果鍵值對的鍵以"_orig_mod."開頭,
    # 那麼就將這個鍵值對的鍵去掉"_orig_mod."首碼,並將這個鍵值對從state_dict中移除。
    unwanted_prefix = '_orig_mod.'
    for k,v in list(state_dict.items()):
        if k.startswith(unwanted_prefix):
            state_dict[k[len(unwanted_prefix):]] = state_dict.pop(k)
    model.load_state_dict(state_dict)
    iter_num = checkpoint['iter_num']
    best_val_loss = checkpoint['best_val_loss']
# 用openAI的weight
elif init_from.startswith('gpt2'):
    print(f"Initializing from OpenAI GPT-2 weights: {init_from}")
    override_args = dict(dropout=dropout)
    model = GPT.from_pretrained(init_from, override_args)
    # read off and override the GPT sizing model args from the model config
    model_args['n_layer'] = model.config.n_layer
    model_args['n_head'] = model.config.n_head
    model_args['n_embd'] = model.config.n_embd
# crop down the model block size if desired
if block_size < model.config.block_size:
    model.crop_block_size(block_size)
model.to(device)

之後是對模型進行編譯,compile是PyTorch 2.0中新增加的一個功能,它可以將模型編譯成一種新的形式,以提高運行速度。

1
2
3
4
if compile:
    print("compiling the model... (takes a ~minute)")
    unoptimized_model = model
    model = torch.compile(model) # requires PyTorch 2.0

下面這段代碼實現學習率的變化

餘弦衰減是一種學習率調整策略,它的基本思路是在訓練的開始階段使用較大的學習率,然後在訓練的後期降低學習率。具體來說,它在訓練過程中會將學習率按照一個餘弦函數進行衰減,在訓練開始時學習率較大,在訓練後期逐漸降低到最小值。這樣做的好處是能夠在訓練開始時較快地接近最優解,並且在後期能夠防止過擬合。

1
2
3
4
5
6
7
8
9
10
11
12
def get_lr(iter):
    # 1) 在warmup_iters步內使用線性增長,即使學習率每步增加learning_rate * iter / warmup_iters
    if iter < warmup_iters:
        return learning_rate * iter / warmup_iters
    # 2) 當iter> lr_decay_iters時,返回最小學習率min_lr。
    if iter > lr_decay_iters:
        return min_lr
    # 3) 在這之間,使用餘弦衰減,最終值為最小學習率min_lr。
    decay_ratio = (iter - warmup_iters) / (lr_decay_iters - warmup_iters)
    assert 0 <= decay_ratio <= 1
    coeff = 0.5 * (1.0 + math.cos(math.pi * decay_ratio)) # coeff ranges 0..1
    return min_lr + coeff * (learning_rate - min_lr)

接下來是訓練的過程

1
2
3
4
5
6
7
8
9
10
11
12
13
14
15
16
17
18
19
20
21
22
23
24
25
26
27
28
29
30
31
32
33
34
35
36
37
38
39
40
41
42
43
44
45
46
47
48
49
50
51
52
53
54
55
56
t0 = time.time()
while True:

    # 判斷是否需要進行學習率衰減。如果需要,就調用 get_lr 函數
    # 來計算當前疊代次數對應的學習率,並將這個學習率賦值給 optimizer 的 param_group。
    # 如果不需要,就直接使用預設的學習率。
    if decay_lr:
        lr = get_lr(iter_num)
        for param_group in optimizer.param_groups:
            param_group['lr'] = lr
    else:
        lr = learning_rate
    # 如果到了需要eval的時候並且是master process,就計算一下現在的loss,根據eval的值來保存checkpoint
    if iter_num % eval_interval == 0 and master_process:
        losses = estimate_loss()
        print(f"step {iter_num}: train loss {losses['train']:.4f}, val loss {losses['val']:.4f}")
        if losses['val'] < best_val_loss or always_save_checkpoint:
            best_val_loss = losses['val']
            raw_model = model.module if ddp else model
            if iter_num > 0:
                checkpoint = {
                    'model': raw_model.state_dict(),
                    'optimizer': optimizer.state_dict(),
                    'model_args': model_args,
                    'iter_num': iter_num,
                    'best_val_loss': best_val_loss,
                    'config': config,
                }
                print(f"saving checkpoint to {out_dir}")
                torch.save(checkpoint, os.path.join(out_dir, 'ckpt.pt'))
    if iter_num == 0 and eval_only:
        break

    # 可以通過對gradient_accumulation_steps的設置模擬更大 batch size
    for micro_step in range(gradient_accumulation_steps):
        X, Y = get_batch('train')
        if ddp:
            model.require_backward_grad_sync = (micro_step == gradient_accumulation_steps - 1)
        with ctx:
            logits, loss = model(X, Y)
        loss.backward()
    optimizer.step()
    optimizer.zero_grad(set_to_none=True)

    # 計算時間並且記錄日誌
    t1 = time.time()
    dt = t1 - t0
    t0 = t1
    if iter_num % log_interval == 0 and master_process:
        lossf = loss.item() # loss as float. TODO note CPU-GPU sync! profile, make sure not too slow
        print(f"iter {iter_num}: loss {lossf:.4f}, time {dt*1000:.2f}ms")
    iter_num += 1

    # 超過限定次數就退出
    if iter_num > max_iters:
        break