Reference
HuggingFace
[@xiaomajiaHuggingfaceTransformers2022] : 更好看懂
Introduction
Transformers的目的是為了:
-
幫助NLP研究者進行大規模的transformer模型
- 幫助工業界的使用者微調模型並且不是到生產環境
- 幫助工程師下載預訓練模型並且解決實際問題
它的設計原則包括:
- 易用
- 只有configuration,models和tokenizer三個主要類。
- 所有的模型都可以通過統一的from_pretrained()函數來實現加載,transformers會處理下載、緩存和其它所有加載模型相關的細節。而所有這些模型都統一在Hugging Face Models管理。
- 基于上面的三個類,提供更上層的pipeline和Trainer/TFTrainer,從而用更少的代碼實現模型的預測和微調。
- 因此它不是一個基礎的神經網絡庫來一步一步構造Transformer,而是把常見的Transformer模型封裝成一個building block,我們可以方便的在PyTorch或者TensorFlow裡使用它。
- 儘量和原論文作者的實現一致
- 每個模型至少有一個例子實現和原論文類似的效果
- 儘量參考原論文的實現,因此有些代碼不會那麼自然
主要概念
- 諸如BertModel的模型(Model)類,包括30+PyTorch模型(torch.nn.Module)和對應的TensorFlow模型(tf.keras.Model)。
- 諸如BertConfig的配置(Config)類,它保存了模型的相關(超)參數。我們通常不需要自己來構造它。如果我們不需要進行模型的修改,那麼創建模型時會自動使用對於的配置
- 諸如BertTokenizer的Tokenizer類,它保存了詞典等信息並且實現了把字元串變成ID序列的功能。
所有這三類對象都可以使用from_pretrained()函數自動通過名字或者目錄進行構造,也可以使用save_pretrained()函數保存。
###
使用pipeline
使用預訓練模型最簡單的方法就是使用pipeline函數,它支持如下的任務:
- 情感分析(Sentiment analysis):一段文本是正面還是負面的情感傾向
- 文本生成(Text generation):給定一段文本,讓模型補充後面的內容
- 命名實體識別(Name entity recognition):識別文字中出現的人名地名的命名實體
- 問答(Question answering):給定一段文本以及針對它的一個問題,從文本中抽取答案
- 填詞(Filling masked text):把一段文字的某些部分mask住,然後讓模型填空
- 摘要(Summarization):根據一段長文本中生成簡短的摘要
- 翻譯(Translation):把一種語言的文字翻譯成另一種語言
- 特徵提取(Feature extraction):把一段文字用一個向量來表示
Foundation Network
基本所有的 LLM 都是用 transformer network 作為 foundation network.
差別只是大小,encoder/decoder/both,training 的方式。
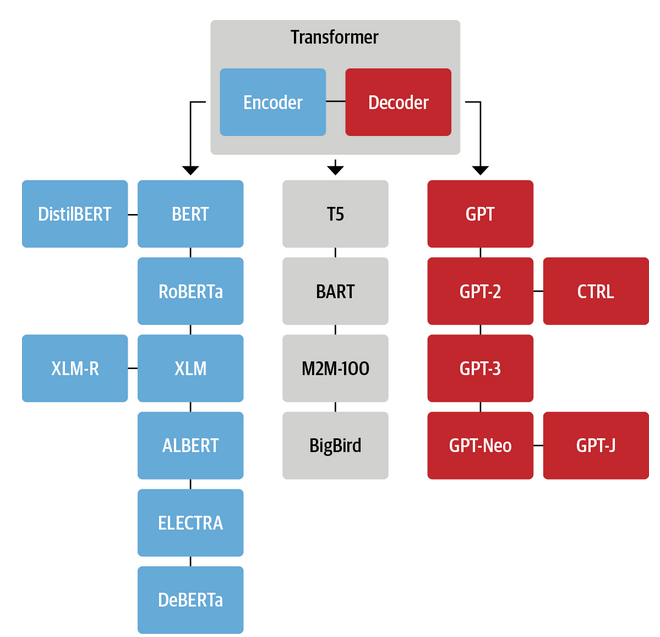
Hugging Face 對於 NLP 提供很好的 tutorial。以下是 NLP language model (不含 image) 的分類,包含 tasks.
| Model | Examples | Tasks |
|---|---|---|
| Encoder | ALBERT, BERT, DistilBERT, ELECTRA, RoBERTa | Sentence classification, named entity recognition, extractive question answering |
| Decoder | CTRL, GPT, GPT-2, Transformer XL | Text generation |
| Encoder-decoder | BART, T5, Marian, mBART | Summarization, translation, generative question answering |
HunggingFace 的 tutorial 很好的説明這一點:
Transformer class 定義 pipeline module.
pipeline 的參數包含
| Downstream Task | Type | Default Network |
|---|---|---|
| sentiment-analysis | (bi-direction) encoder | distilbert-base-uncased-finetuned-sst-2-english |
| zero-shot-classification | (bi-direction) encoder+ (auto-regression) decoder (?) | bart-large-mnli |
| text-generation | (auto-regression) decoder | gpt2 or dsitilgpt2 |
| full-mask 填空 | (bi-direction) encoder | distilroberta |
| question-answering | (bi-direction) encoder | distilbert-base-cased-distilled-squad |
| summarization | (bi-direction) encoder+ (auto-regression) decoder | distilbart-cnn-12-6 |
| translation | opus-mt-fr-en | opus-mt-fr-en |
- sentiment-analysis: default 使用 distilled bert: distilbert-base-uncased-finetuned-sst-2-english
下面我們來看一個情感分析的例子:
1 | |
當第一次運行的時候,它會下載預訓練模型 (這個 pipeline task 預設是 distilbert-base-uncased-finetuned-sst-2-english, pytorch_model.bin, 268MB) 和分詞器 (tokenizer, tokenizer_config.json) 並且緩存下來。分詞器的左右是把文本處理成整數序列。最終運行的結果為:
1 | |
我們也可以一次預測多個結果:
1 | |
運行結果為:
1 | |
上面的第二個句子被分成了負面的情感,這是因為模型是二分類的模型,不過它的得分是在0~1之間比較居中的部分。預設的 ”sentiment-analysis” 會使用 distilbert-base-uncased-finetuned-sst-2-english 模型。它是把 DistilBERT 模型在 SST-2 這個任務上 fine-tuning 後的結果。
我們也可以指定其它的情感分類模型,比如我們可能需要對法語進行情感分類,那麼上面的模型是不適合的,我們可以去model hub尋找合適的模型。比如我們可以使用:
1 | |
除了通過名字來制定model參數,我們也可以傳給model一個包含模型的目錄的路徑,也可以傳遞一個模型 object。如果我們想傳遞模型object,那麼也需要傳入tokenizer。
我們需要兩個 class,一個是 AutoTokenizer,我們將使用它來下載和加載與模型匹配的Tokenizer。另一個是AutoModelForSequenceClassification。注意:模型類是與任務相關的,我們這裡是情感分類的分類任務,所以是AutoModelForSequenceClassification。
我們在使用前需要import:
1 | |
為了下載和加載模型,我們只需要使用 from_pretrained 函數:
1 | |
Pipeline 流程 = Tokenizer + Model + Post-Processing
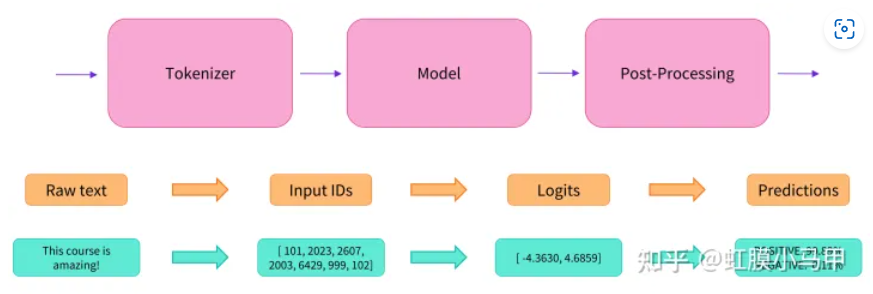
下面我們來看一下pipeline實際做了哪些工作。首先它會使用前面的from_pretrained函數加載Tokenizer和模型:
1 | |
Tokenizer
Tokenizer的作用大致就是分詞,然後把詞變成的整數ID,當然有些模型會使用 subword。但是不管怎麼樣,最終的目的是把一段文本變成ID的序列。當然它也必須能夠反過來把ID序列變成文本。關於Tokenizer更詳細的介紹請參考這裡,後面我們也會有對應的詳細介紹。
下面我們來看一個例子:
1 | |
Tokenizer object 是 callable,因此可以直接傳入一個字元串,返回一個 dict。最主要的是ID的list,同時也會返回attention mask:
1 | |
我們也可以一次傳入一個batch的字元串,這樣便于批量處理。這時我們需要指定padding為True並且設置最大的長度:
1 | |
truncation為True會把過長的輸入切掉,從而保證所有的句子都是相同長度的,return_tensors=”pt”表示返回的是PyTorch的Tensor,如果使用TensorFlow則需要設置return_tensors=”tf”。
我們可以查看分詞的結果:
1 | |
pt_batch仍然是一個dict,input_ids是一個batch的ID序列,我們可以看到第二個字元串較短,所以它被padding成和第一個一樣長。如果某個句子的長度超過max_length,也會被切掉多餘的部分。
模型 Model
Tokenizer的處理結果可以輸入給模型,對於TensorFlow來說直接輸入就行,而對於PyTorch則需要使用 ** 來展開參數:
1 | |
Transformers的所有輸出都是tuple,即使只有一個結果也會是長度為1的tuple:
1 | |
Post-Processing
Transformers的最後一層輸出 logits。它們需要經過一個 SoftMax 轉換為概率。
所有 Transformers 模型都輸出 logits,因為用於訓練的 loss 函數一般會將最後的激活函數 (如SoftMax) 與實際損耗函數 (如交叉熵) 融合 。
1 | |
得到和前面一樣的結果:
1 | |
如果我們有輸出分類對應的標籤,那麼也可以傳入,這樣它除了會計算logits還會loss:
1 | |
輸出為:
1 | |
PyTorch and TensorFlow 呼叫 Transformer
from_pretrained 返回的是 PyTorch 的 torch.nn.Module 或者 TensorFlow 的 tf.keras.Model。因此我們可以很容易的把 Transformer融入我們的代碼裡,自己來實現訓練或者預測。但是Transformers包內置了一個Trainer class,方便我們訓練或者fine-tuning。
我們訓練完成後就可以保存模型到一個目錄中:
1 | |
之後我們想用的時候隨時可以使用from_pretrained函數加載它們。Transformers包非常酷的一點就是它可以輕鬆的在PyTorch和TensorFlow之間切換。比如下面的例子是保存PyTorch的模型然後用TensorFlow加載:
1 | |
如果用PyTorch加載TensorFlow模型,則需要設置from_tf=True:
1 | |
除了logits,我們也可以返回所有的隱狀態和attention:
1 | |
具體的模型類
AutoModel和AutoTokenizer只是方便我們使用,但最終會根據不同的模型(名字或者路徑)構造不同的模型對象以及與之匹配的Tokenizer。前面的例子我們使用的是distilbert-base-uncased-finetuned-sst-2-english這個名字,AutoModelForSequenceClassification 會自動的幫我們加載DistilBertForSequenceClassification模型。
知道原理後我們也可以自己直接構造這些模型:
1 | |
自定義模型
如果你想自定義模型(這裡指的是調整模型的超參數,比如網絡的層數,每層的attention head個數等等,如果你要實現一個全新的模型,那就不能用這裡的方法了),那麼你需要構造配置類。每個模型都有對應的配置類,比如DistilBertConfig。你可以通過它來指定隱單元的個數,dropout等等。如果你修改了核心的超參數(比如隱單元的個數),那麼就不能使用from_pretrained加載預訓練的模型了,這時你必須從頭開始訓練模型。當然Tokenizer一般還是可以復用的。
下面的代碼修改了核心的超參數,構造了Tokenizer和模型對象:
1 | |
如果我們只改變最後一層,這是很常見的,比如把一個兩分類的模型改成10分類的模型,那麼還是可以復用下面那些層的預訓練模型。我們可以獲取預訓練模型的body,然後自己增加一個輸出為10的全連接層。但是這裡有更簡單的方法,調用from_pretrained函數然後設置num_labels參數:
1 | |
我們可以看一下代碼:
1 | |
預訓練模型通常是語言模型(比如Masked LM或者NSP這樣的任務),所以DistilBertForSequenceClassification只會復用它的body部分,head部分是重新構造的。
Appendix
Transformer Family Encoder 比較:ViT, CLIP, BLIP, BERT
Ref: [@jizhiTransformerFamily2022]
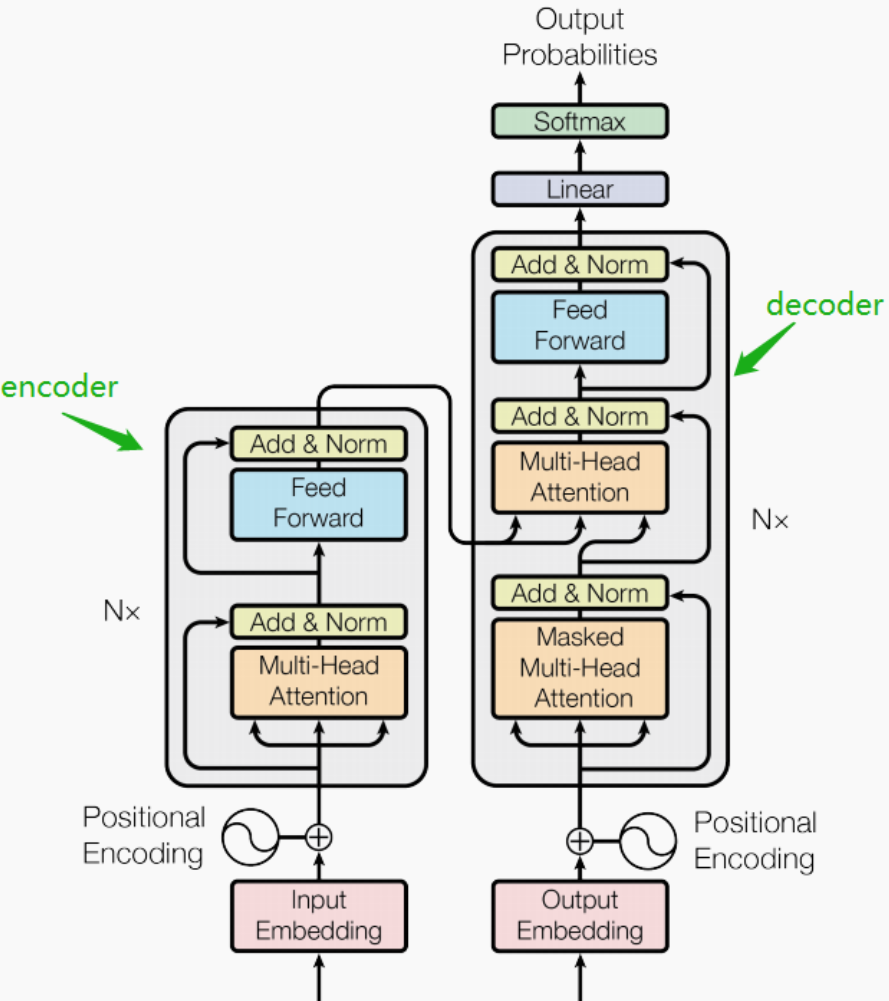
完整的 transformer 包含 encoder (discriminative) 和 decoder (generative).
以下我們主要聚焦於 encoder 部分。因爲 stable diffusion 的 decoder (generative) 部分是由 U-Net 完成的。雖然目前也有 transformer-based 的 decoder.
| Type | Input | Output | |
|---|---|---|---|
| Transformer | Encoder+decoder | Text | Text |
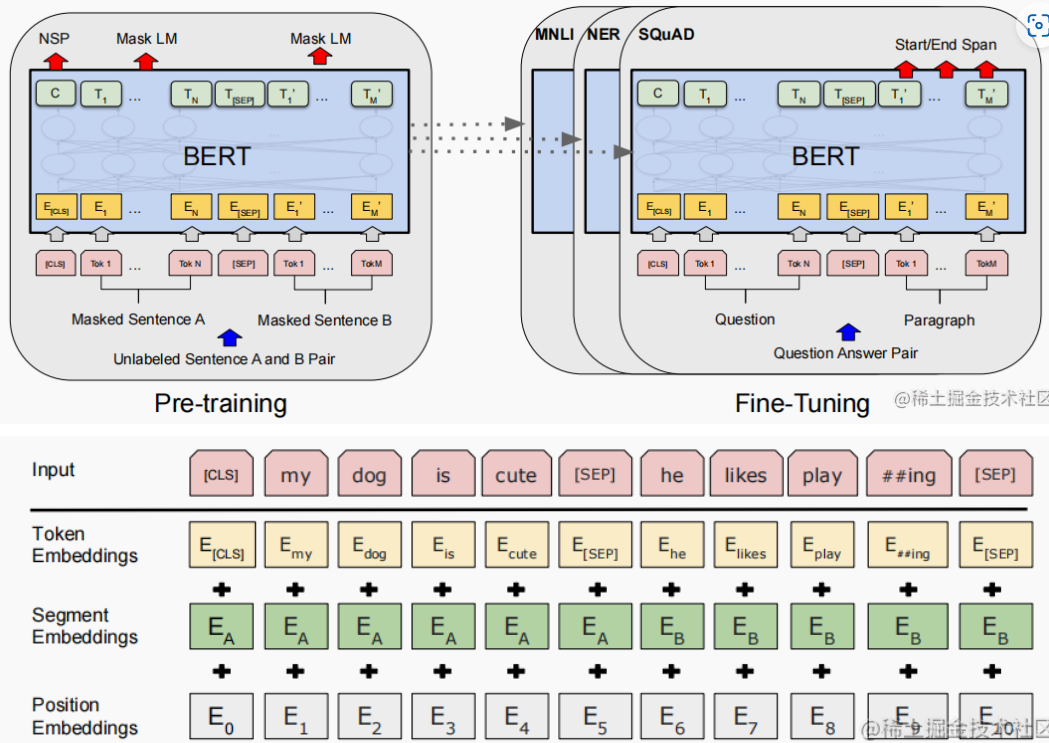
| BERT | Encoder | Text | Token Embeddings |
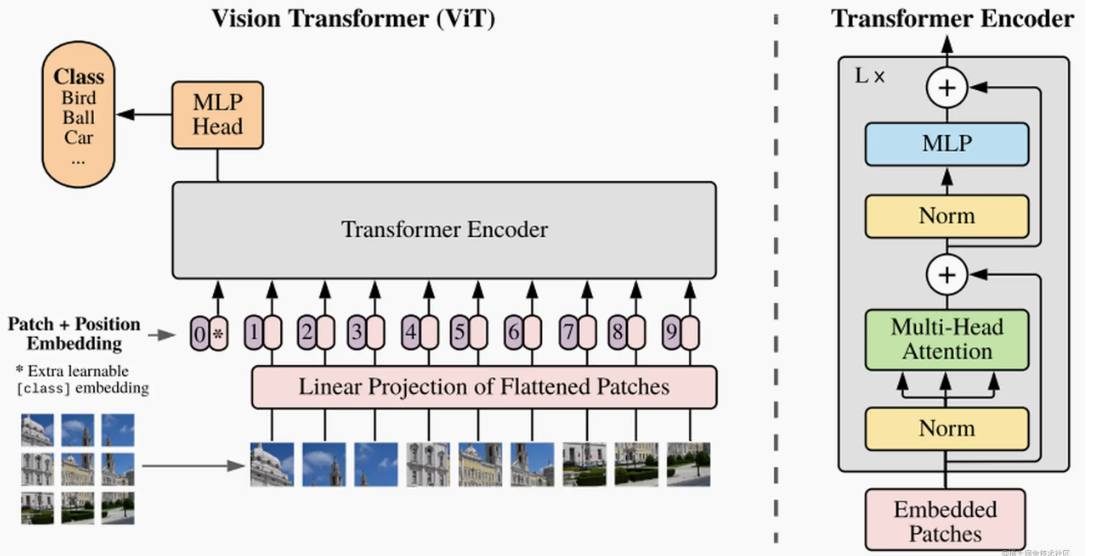
| ViT | Encoder | Image | Token Embeddings |
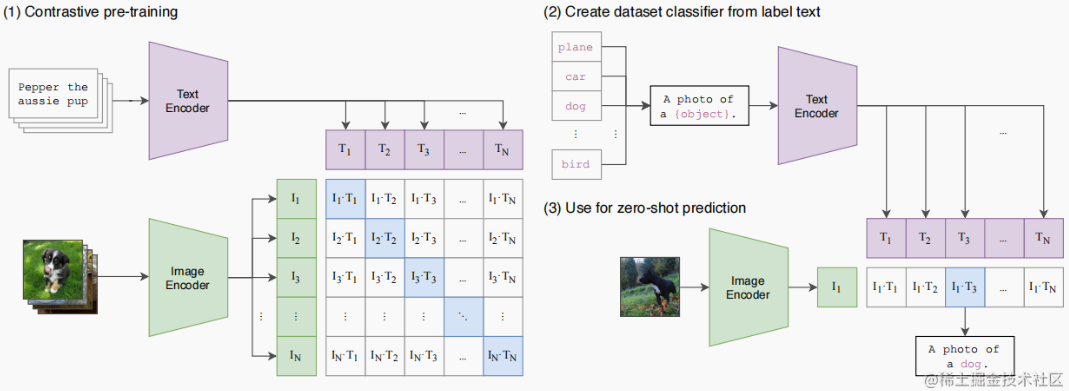
| CLIP | Encoder | Text & Image | Similarity Score |
| BLIP | Encoder+decoder | Text & Image | Token Embeddings? |
| GPT1/2/3 | Decoder | Text | Text |
Fine Tuning Network
Appendix
BERT: Bidirectional Encoder Representations from Transformer
ViT: Vision Transformer Encoder
CLIP: Contrastive Language-Image Pre-Training Encoder
CLIP是一個 multi-modal vison and language model。它可用於 (image-text) 圖像和文本的相似性以及 zero-shot 圖像分類 (見下圖)。CLIP 使用 ViT-like transformer 獲取視覺特徵,並使用因果語言模型 (causal language model) 獲取文本特徵。然後將文本和視覺特徵投影到具有相同維度的 latent space。最後投影圖像和文本特徵之間的内積產生相似性的分數 (score of similarity)。
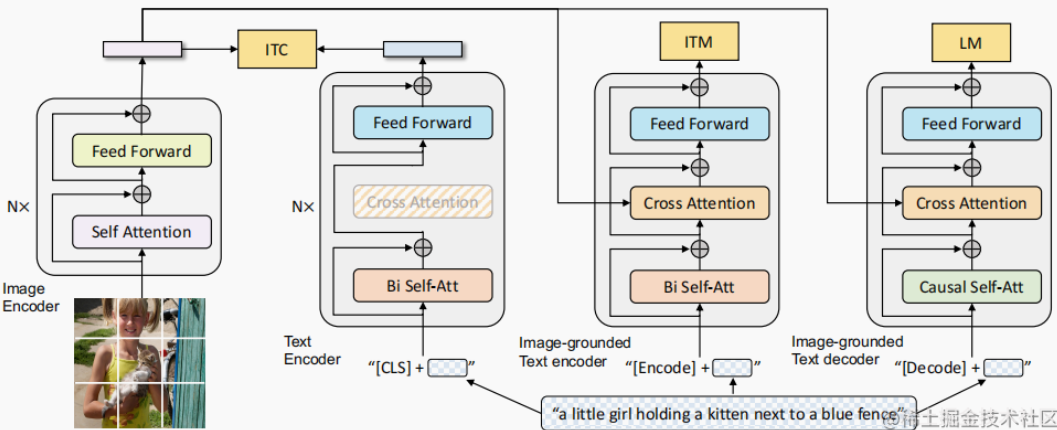
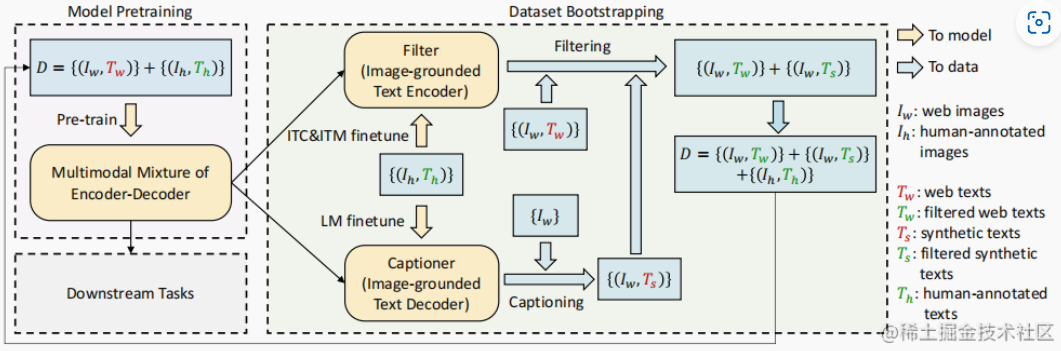
BLIP: Bootstrapping Language-Image Pre-training Encoder/Decoder