Reference
https://zhuanlan.zhihu.com/p/601044938
Github of Karpathy
allenlu/ml_code/Cursor/nanogpt
Introduction
The initial intention was simple. I tried to use Cursor to generate a nanoGPT, i.e. decoder-only transformer structure. Then I can use step-by-step to add more function such as KV cache, speculative decoder, etc.
Overall assessment: useful but buggy! Probably still in the early phase of code generation. There are competing products: Claude Sonnet code generation. Github copilot using GPT-1o. and VS Code plugin.
Lesson Learned
- Separate model parameter, training parameter, inferencing parameter.
1 | |
- First compare to golden model: check parameter number, layer number and sequence.
- Make sure to apply Causal Mask to Attention Block for “training” and generation! This is the ABC of generative AI.
- Check generation method: deterministic vs. probabilistic. Use deterministic generation helps for debugging!
Greedy: deterministic Top-K: probabilistic, but only pick from top-K Normal multi-nomial sampling
- Pre-LN (Layer Normalization) and Post-LN (Layer Normalization) does not seem to change the results. [[2024-1004-Xformer_Layer_Norm|LN Placement]]
- Do NOT use pytorch built-in nn.MultiheadAttention! (OK to use, the issue is to apply Causal Mask!)
- Suggestion: PreLN, all bias on + last LayerNorm. PostLN, all bias off.
Multihead Attention Bias, Layer Normalization Setting
nn.MultiheadAttention 正確的 bias parameter is: bias, default=True nn.MultiheadAttention 還有一個奇怪的 parameter: add_bias_kv, default=False! 不知道用途。 Suggestion: PreLN, all bias on + last LayerNorm. PostLN, all bias off.
![[Pasted image 20241003194622.png]]
The following explanation is wrong! https://ai.stackexchange.com/questions/40252/why-are-biases-typically-not-used-in-attention-mechanism
qkv_bias = False. qkv_bias seems not important. Remove the bias can save some parameters.``` ~~For certain types of layers, such as transformers and convolutional layers, including a bias term is unnecessary and adds unnecessary overhead to the model.
The reason for this is that these layers are typically followed by a normalization layer, such as Batch Normalization or Layer Normalization. These normalization layers center the data at mean=0 (and std=1), effectively removing any bias.
Therefore, it is common practice to omit the bias term in transformers and convolutional layers that are preceded by a normalization layer.~~
1 | |
Training (Hyper)-Parameters
Training parameters are dynamic parameters. They are not part of the model, and can be changed during training.
- Use Shakespeare Dataset from Karpathy’s NanoGPT project.
- batch_size and seq_length are used to dice the Shakespeare Dataset for training LLM.
- num_epoches and learning_rate are used for the stop condition.
- Change seq_length to the same as block_size can help to reduce the loss and get better generation results!
1 | |
Inferencing (Hyper)-Parameters
Inferencing parameters are dynamic parameters. They are not part of the model, and can be changed during inferencing.
- Greedy sampling: True: deterministic; False: probabilistic
- New_token is auto-regressive token generation.
1 | |
However, I was stuck on the step 1.
Step 1 goal PicoGPT: scaled down version of NanoGPT
It took me 4-days to get a reasonable PicoGPT, but it still outputs garbages with prompt Before we proceed any further, as shown below
- PicoGPT model size: 2.468M
- PicoGPT uses post layer normalization
- Parameter size (MB) : 6.71MB is strange!
- Becuase the parameter is long: the size should be 2.468 x 4 = 9.87 MB
- 6.71 / 9.87 = 68% -> It seems all attention parameters are NOT instantiated!
- Training: input shape: [batch_size, block_size, vocab_size] = [32, 256, 65]
- Training: embed shape: [batch_size, block_size, n_embed] = [32, 256, 256]
- Training: loss is small: 0.0153
- Inferencing with input prompt:
Before we proceed any further - Inferencing generation of garbage: r re for ryrouourr ….
1 | |
Debug NanoGPT: copy NanoGPT (from Karpathy’s repo?) and scale down for comparison.
I use summary function (very good one!) and found NanoGPT parameters size NOT scaling with the layer number. It turns out a syntax bug of NanoGPT!. I fixed the bug as below. The detailed explanation is in Appendix A.
1 | |
After correction of the bug of NanoGPT, I got the seemingly correct output from NanoGPT with the same input prompt. But the average loss is big (1.7) and the loss does not decrease with the increase of layer number!
- Scaled down NanoGPT model size: 2.466M
- NanoGPT uses pre-layer normalization
- Parameter size (MB) : 9.87MB (2.466 x 4 = 9.86). That is 1 parameter = 4 byte (long)
- Training: input shape: [batch_size, block_size, vocab_size] = [32, 256, 65]
- Training: embed shape: [batch_size, block_size, n_embed] = [32, 256, 256]
- Training: loss is big: 1.7!
- Inferencing with input prompt:
Before we proceed any further - Inferencing generation (seems OK): LUCENTIO: Lest, be not ….
The difference
- Scaled down NanoGPT has almost same but less parameter than PicoGPT: 2466369 vs. 2468161
- Difference: Pico - Nano = 1792 = 3 (layers) x 8 (heads) x 3 (KQV) x 32 (bias) - 512.
- That is, Pico adds bias on multi-head layers, but lack of the final LayerNorm layers (no need for PostLN).
- PicoGPT LayerNorm sequence is different compared to NanoGPT.
- PicoGPT uses Post-LN: easier for training convergence
- NanoGPT uses Pre-LN: supposed more difficult to converge but has a lower loss
1 | |
1 | |
Debug NanoGPT: copy GPTModel (from Rasbt repo) and scale down for comparison.
- Scaled down model size: 2.469M
- It is similar to PicoGPT because (1) same qkv_bias (+0), (2) lack of last linear layer bias (-65), but add one extra last LayerNorm (+512)
- The total number is 2468161 - 65 + 512 = 2468608.
- Use GeLU rather than ReLU
- Training: input shape: [batch_size, block_size, vocab_size] = [32, 256, 65]
- Training: embed shape: [batch_size, block_size, n_embed] = [32, 256, 256]
- Training: loss is better: 1.1
- Inferencing with input prompt:
Before we proceed any further - Inferening generation (seems OK): Before we proceed any further of us to tears; How dearly perish within these artitives. ANTONIO: Siger’? Cle w MINO: HO: I tumap
1 | |
PicoGPT Issue: Layernorm sequence (Post-LN vs. Pre-LN), No dropout!, No Last Layernorm
Debug PicoGPT: Change Layer Sequence (Not issue!), add last LayerNorm (no improvement, not real issue!)
Debug PicoGPT: Deterministic vs. Probabilistic Generation (no improvement, Not Real Issue)
NanoGPT uses probabilistic sampling.
- softmax for probability distribution
- multinomial for sampling following the softmax
PicoGPT uses deterministic (greedy) sampling.
- argmax for greedy sampling
It turns out Generation method is nothing to do with the problem. But use determinstic generation helps for debugging!
1 | |
Real Issue: MultiHead Attention!! Work after changing the multi-head attention. From 6.7MB/9.7M = 68%, It seems multi-head attention block is NOT instantiated.
- After using RasbtGPT MultiheadAttention. It works.
- By setting the training parameter seq_length = 256 (same as block_size), it improved the loss and output better words.
- Parmeters: 2466369: no kv_bias, add last layer norm (512)
- Loss: 0.96
1 | |
Use Claude sonnet generate the MutlheadAttention. It works after adding the causal mask!
- PicoGPT model size: 2.466M
- Parameter size (MB) : 9.87MB
- Training: loss is small: 0.84
- Inferencing with input prompt:
Before we proceed any further
1 | |
Change the context length from 256 to 300 for easy debugging!
- PicoGPT model size: 2.78M
- Parameter size (MB) : 6.76MB
- Training: loss is small: 0.73
- Inferencing with input prompt:
Before we proceed any further
1 | |
PicoGPT-6Layers
Increase the PicoGPT to 6-layers to double the parameters, the loss performance is improved.
- PicoGPT 6-layer model size: 4.833M
- Parameter size (MB) : 19.33MB
- Training: loss is small: 0.54
- Inferencing with input prompt:
Before we proceed any further
1 | |
Appendix A: Transformer Layer
Original Code (Incorrect)
1 | |
Problem:
The expression *[TransformerBlock(config)] * config.n_layers creates multiple references to the same TransformerBlock instance. This means that instead of creating n_layers unique layers, you’re creating multiple references to a single layer, so the trainable parameters don’t scale with config.n_layers.
Solution:
I need to create n_layers unique instances of TransformerBlock, rather than duplicating the same instance. This can be done by using a list comprehension that creates a new TransformerBlock for each layer.
Corrected Code:
1 | |
Explanation:
- List comprehension:
TransformerBlock(config) for _ in range(config.n_layers)creates a new instance ofTransformerBlockfor each layer in the model, ensuring that each layer has its own trainable parameters. nn.Sequential: This wraps the list of layers into a sequential model, where the input is passed through each layer one after another.
Use the same python file for VS code and Colab Jupyter notebook.
Two different models generated from Cursor + GPT-4o-mini
Lesson learned
- Use configuration
- …
前文提到 GPT network. 本文用實際的 code example 來說明。我們用 Karpathy 的 nanoGPT 為例。
Karpathy 是 OpenAI 的 cofounder (2015-2017), 前 Tesla AI 總監 (2017 - 2023),李飛飛高徒。2023/1 發佈的NanoGPT,是他2年前 MiniGPT 的升級版。2023/2 Karpathy 再度加入 OpenAI.
據作者介紹,代碼簡單易讀,2個僅300行代碼的檔案。
現已基于OpenWebText重現 GPT-2 (124M),在單個8XA100 40GB節點上,訓練時間為38小時。
OpenAI GPT2 checkpoint 可以得到 GPT baselines 如下 (using OpenWebText dataset):
| Model | Params | Train loss | Val Loss |
|---|---|---|---|
| GPT2 | 124M | 3.11 | 3.12 |
| GPT2-medium | 350M | 2.85 | 2.84 |
| GPT2-large | 774M | 2.66 | 2.67 |
| GPT2-xl | 1558M | 2.56 | 2.54 |
| NanoGPT | 10.65M | 1.21 莎士比亞 data |
1.22 莎士比亞 data |
| NanoGTP | ? | 3.11 2.85 w/ finetune finetuneOpenWebText |
3.11 2.85 w/ finetune finetuneOpenWebText |
| PicoGPT-3layer | 2.47M | 0.9 莎士比亞 data | ? |
| PicoGPT-6layer | 4.83M |
NanoGPT
發佈檔案裡面包含一個約300行的GPT模型定義(檔案名:model.py),可以選擇從OpenAI加載GPT-2權重。
還有一個訓練模型PyTorch樣板(檔案名:train.py),同樣也是300多行。
作者補充道,代碼並不難,很容易就能滿足大家需求——無論是從頭開始訓練新模型,還是基于預訓練進行微調(目前可用的最大模型為1.3B參數的GPT-2)。
Training
Karpathy 提供 quick start for training the model.
Shakespear Datasets
Default 使用 bfloat16 and pytorch2.0. 我的 GTX-1080 GPU (8GB) 和 driver 不支持 bfloat16 和 CUDAx 所以改成 float32 和 pytorch2 = False.
在 train 3 個小時后 : step 500, val loss: 1.4640
iter 490: loss 1.2073, time 17068.56ms, mfu 0.85% step 500: train loss 1.0899, val loss 1.4640
Karpathy 使用 A100 GPU (40GB) 只用了 3min (60X) 就得到 validation loss: 1.4697.
- BF16 比 FP32 理論上快了 2X.
- Pytorch 2.0 比 Pytorch 1.13 快了 1.5X?
- A100 比 GTX-1080 快了 20X??
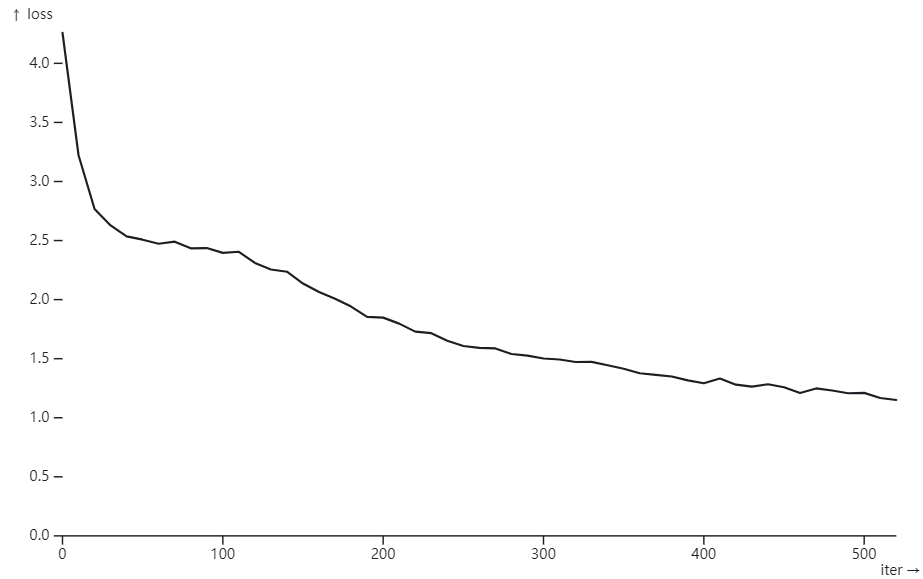
使用 Simon Willison 的 “Plot loss from nanoGPT” Plot loss from nanoGPT / Simon Willison Observable (observablehq.com)
Appendix
Appendix A: Model.py
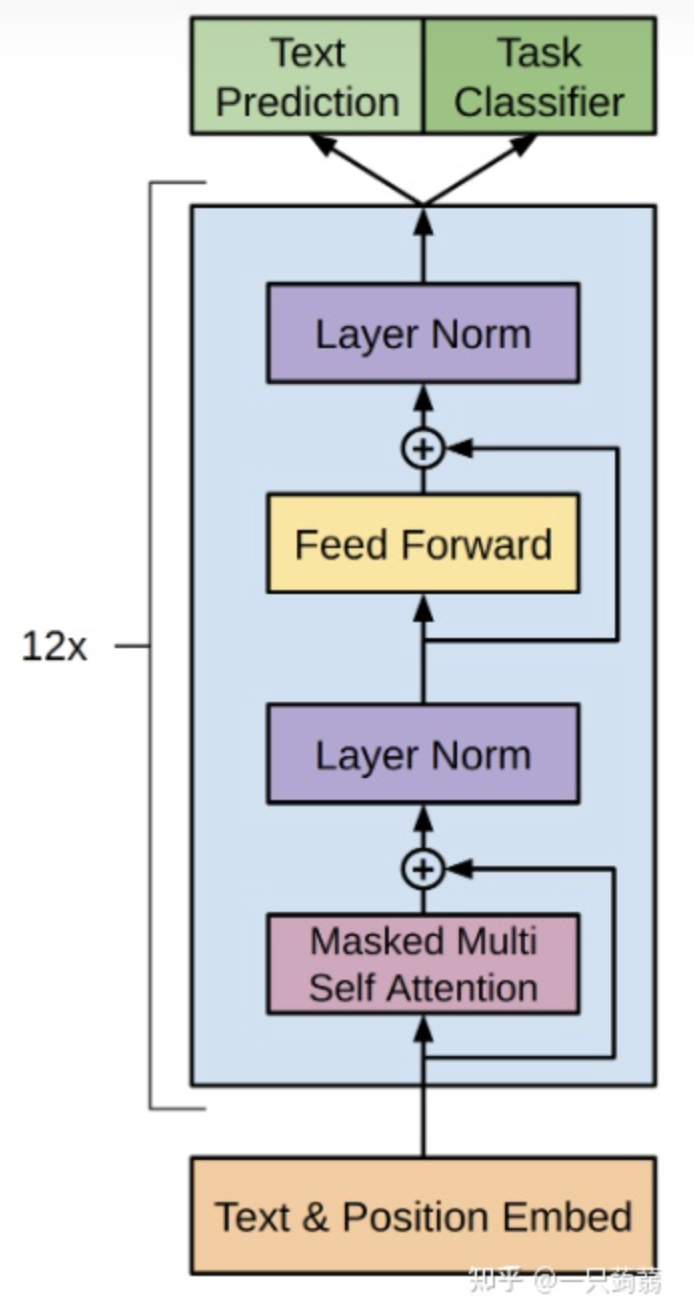
我們先 review GPT 作為 transformer decoder 的 block diagram.
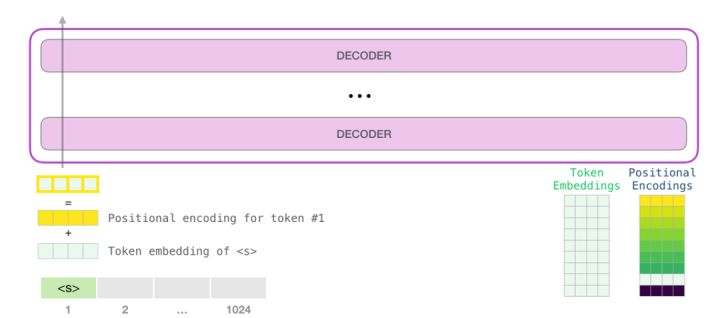
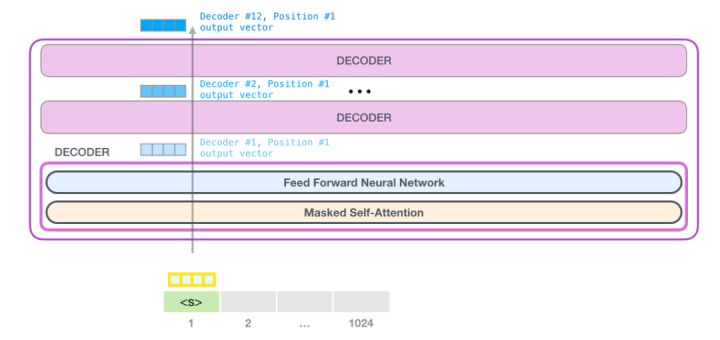
比較詳細的 block diagram:
- 12 個 stacking decoders
- 每個 decoder 包含 masked multi-head self attention + layer norm + feed forward + layer norm.
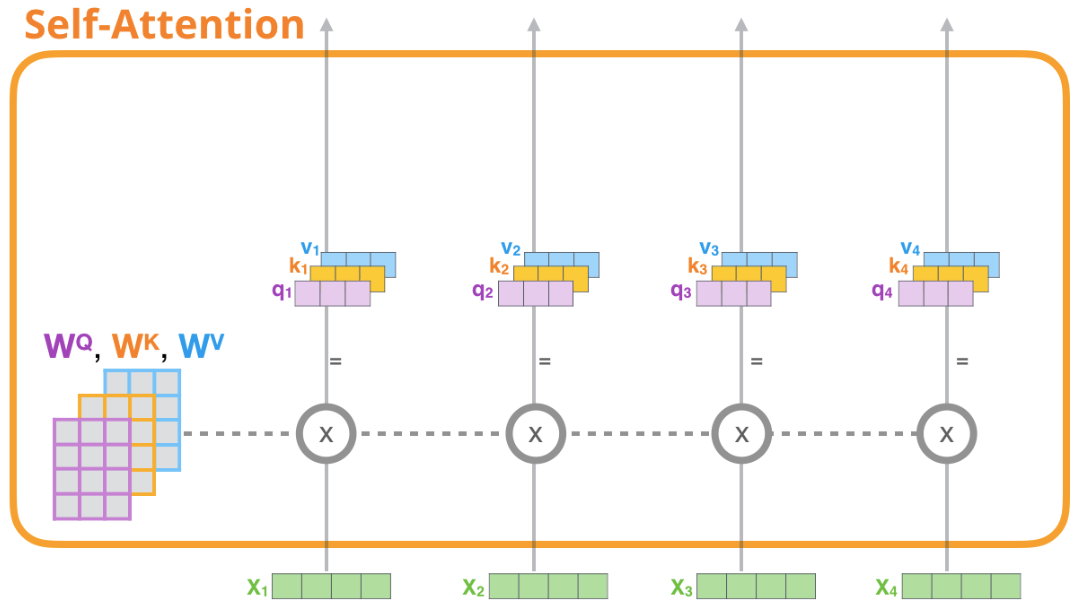
Self Attention Layer
這一部分就是圖中Masked Multi Self Attention的實現,也是transformer中的核心機制。
這裡的multi-head採用的是把Q,K,V切分成n_head份來實現的。
比較有趣的是mask的部分,tril是得到一個矩陣的下三角矩陣,把一個全1的矩陣放進去就可以得到mask矩陣。而register_buffer可以將一個張量註冊為一個buffer。這意味著這個張量不會被計算梯度,也不會對模型的參數進行更新,可以節省內存,提高計算效率。
1 | |
Feed-Forward Layer
Feed Forward的部分,這裡用到了gelu,似乎是一種類似relu但是更強一些的激活函數。
1 | |
一個transformer decoder block的實現,即圖上被藍色包圍的部分
值得一提的是,這裡的實現和圖上有一定區別,圖上是Attention->Layer Norm->Feed Forward->Layer Norm的順序,而這裡實現的是LayerNorm->Attention->LayerNorm->Feed Forward的順序。
這個Block的輸入的shape和輸出的shape都是(batch_size, suquence_length, embedding_dimensionality)
1 | |
下面就是GPT模型實現的部分
__init__部分中實現了input和output的embedding的參數共享。
具體來說,wte (text embeddings) 的weight是一個大小為(vocab_size, embedding_size)大小的矩陣,而Linear層 (y = x AT + b) 的weight就是A矩陣,為了實現dimension從in_feature到out_feature的轉換,A矩陣的形狀需要是(out_feature, in_feature),剛好就是shape為(vocab_size, embedding_size)的一個矩陣,所以這裡直接賦值,就是淺拷貝,實現了參數共享。
1 | |
接下來就是GPT class的forward函數,target表示目標輸出的label,根據有沒有傳進來決定要不要計算loss。
x[:, [-1], :]和x[:,-1,:]的區別就是後者會只剩下兩個維度,不保留第二維,但是前者會保留第二維,大小為1。
1 | |
下面是generate的實現,生成max_new_tokens長度的文本。
temperature是預測概率的一個超參,通常來說高溫度會使得模型預測的概率分佈更加平均,更加不確定,低溫度會使得模型預測的概率分佈更加偏斜,更加確定。 將 logits[:,-1,:] 除以 temperature 的作用就是將預測概率分佈降溫,使得預測更加不確定,可以生成更加多樣的文本。這個操作可以看成對模型預測的結果加上一些雜訊, 增加生成文本的多樣性。
1 | |
下面是from_pretrained的代碼,從huggingface的GPT模型中加載weight。
這裡比較有意思的是對一個tensor進行copy_的操作也會被記錄在計算圖上,因此需要使用with torch.no_grad()
1 | |
下面的代碼用來配置並返回optimizer,指定在一些權重上衰減或者不衰減。
權重衰減(weight decay)是一種正則化技巧,主要用於防止過擬合。在訓練過程中,權重衰減會使得模型的權重變得更小,從而減少模型的複雜度。
在這個代碼中,作者將模型中的參數分為兩組,一組是需要權重衰減的參數,另一組是不需要權重衰減的參數。參數的分組依據是:
- 偏置項(bias)參數不需要權重衰減,因為偏置項不參與計算,而且往往很小,所以不需要權重衰減來降低其複雜度。
- 層歸一化(LayerNorm)權重參數也不需要權重衰減,因為它的作用是對輸入數據進行標準化,不會對模型的複雜度產生影響。
- 嵌入(Embedding)參數也不需要權重衰減,因為權重衰減可能會抹除詞向量之間的關係,從而降低模型的性能。
- 其它權重參數需要權重衰減。
1 | |
下面的代碼是減少block size的,因為from pretrained的GPT預設block size為1024,這個函數可以減少block size,目前的block size只在self attention的mask矩陣bias,wpe中用到,所以只用改這幾個位置。
1 | |
Appendix B: Train.py
train.py沒有明顯的模組,我按照功能把代碼聚集到一起來寫。
下面這一塊是log相關的部分,代碼中用到的工具是wandb,一個類似tensorboard的可視化工具,使用的方法就是用init初始化project,把需要記錄的log用log的函數記錄。
1 | |
這一部分是分散式訓練的相關代碼,用到了DDP來實現
STEP 1:這裡用到了RANK和LOCAL_RANK這兩個環境變數,在DDP中,會給多進程中的每個進程分配獨特的rank和local rank值。rank表示當前進程在分散式集群中的進程編號(就是說不是系統的pid,而是對當前這個程序的所有進程編號),而local_rank表示當前進程在當前機器上的編號。(這裡提一下環境變數,每個進程有自己獨立的環境變數,在創建的時候都繼承了全局環境變數和父進程環境變數)這樣設置rank和local rank的目的是為了讓每個進程能夠知道自己在分散式集群中的位置,方便在分散式訓練中進行通信和同步。
1 | |
STEP 2:把model放到DDP容器裡去
1 | |
STEP 3:在訓練的時候如果使用了ddp,現在model是一個container,裡面的module才是我們的模型
1 | |
STEP 4:在訓練中,只需要在最後一個微步中同步梯度。官方的做法是使用model.no_sync()上下文管理器,但是這段代碼直接設置了model.require_backward_grad_sync變數,當micro_step等於gradient_accumulation_steps-1時,需要同步梯度。
        if ddp:
            model.require_backward_grad_sync = (micro_step == gradient_accumulation_steps - 1)
STEP 5:最後,調用了destroy_process_group()來銷毀進程組
if ddp:
    destroy_process_group()
除此之外,如果是當前的process是master_process,還需要執行創建output dir,初始化wandb,記錄log,計算loss,保存checkpoint。
下面這些是混合精度計算的部分。
nullcontext() 是 PyTorch 的一個函數,用於在 CPU 上運行程序時返回一個空的上下文。這樣做的目的是為了避免在 CPU 上使用 autocast 函數導致的額外計算負擔。
torch.amp.autocast 函數是 PyTorch 的一個自動混合精度計算函數。它可以在運行時自動地切換數據類型,以便在需要時使用高精度,並在不需要時使用低精度。這可以提高程序的運行效率。
1 | |
下面是初始化模型的部分
1 | |
之後是對模型進行編譯,compile是PyTorch 2.0中新增加的一個功能,它可以將模型編譯成一種新的形式,以提高運行速度。
1 | |
下面這段代碼實現學習率的變化
餘弦衰減是一種學習率調整策略,它的基本思路是在訓練的開始階段使用較大的學習率,然後在訓練的後期降低學習率。具體來說,它在訓練過程中會將學習率按照一個餘弦函數進行衰減,在訓練開始時學習率較大,在訓練後期逐漸降低到最小值。這樣做的好處是能夠在訓練開始時較快地接近最優解,並且在後期能夠防止過擬合。
1 | |
接下來是訓練的過程
1 | |
To debug and understand the potential problem with the multi-head attention implementation in the CursorGPT model, let’s walk through the key steps of the code, checking for common issues that can arise in such models:
1. Overview of Multi-Head Attention and Caching
The CachedMultiheadAttention class is designed to handle attention with caching for efficiency during inference. The key steps in the forward method include forming keys, queries, and values, optionally concatenating past key-value pairs, creating attention masks, and then computing the attention outputs using PyTorch’s nn.MultiheadAttention.
2. Common Issues in Attention Implementation
Some common issues in implementing such mechanisms are:
-
Incorrect formation of query, key, and value tensors.
-
Incorrect handling of past key-value pairs.
-
Improper formation of attention masks.
-
Dimension mismatch errors.
-
Issues with the return values and their correct usage in the model.
3. Checking CachedMultiheadAttention
Let’s examine the CachedMultiheadAttention class for potential issues:
Formation of Query, Key, and Value
1 | |
Here, query, key, and value are directly taken from the input x. This is typical for self-attention, but keep in mind they must have proper dimensions for batch, sequence length, and embedding size.
Handling Past Key-Value Pairs
1 | |
This concatenates past keys and values if provided, extending them along the sequence length dimension. This looks correct if past_key_value is consistently formed and used.
Formation of Attention Mask
The handling of attention masks is crucial, especially for auto-regressive models:
1 | |
Here, attn_mask is either adjusted if provided or created as an upper triangular mask (causal mask) if not provided. Ensure this mask is correctly shaped and applied to prevent leakage of future information.
Computing Attention
1 | |
The main function call to nn.MultiheadAttention is correct, assuming all inputs are properly shaped.
4. Issues with the CursorGPT Architecture
Attention Layer Call
1 | |
This call lacks the mask, which may be necessary for certain cases where sequence length isn’t fixed:
1 | |
Generate Method Sampling
The generate method handles sequential token generation but may face issues if use_cache is mishandled.
-
Ensure
use_cacheis properly set. -
Past key-values should propagate correctly through each call during generation.
5. Debugging Strategy
-
Print Shapes: Insert print statements to track tensor shapes at various points.
-
Check Mask Formation: Print and validate the attention mask.
-
Trace Past Key-Values: Ensure they are correctly formed and used.
-
Ensure Return Values: Validate what
generatereturns by printing intermediate values.
Here is a short debugging code snippet added to the CachedMultiheadAttention forward method:
1 | |
Conclusion
Inspect the dimensions of inputs and outputs at each stage, ensure the masking is correctly applied, and validate that values propagate correctly, especially during generation where sequence lengths are variable.