NexT


  • Home

  • Archives

  • Tags

Coherent Optical Communication

Posted on 2022-11-19 | In Language_Tool
revision control
Read more »

Coherent Optical Communication

Posted on 2022-11-19 | In Language_Tool
revision control
Read more »

Git Revision Control

Posted on 2022-11-19 | In Language_Tool
revision control
Read more »

Floating Point Representation

Posted on 2022-11-10 | In Algorithm
浮點運算
Read more »

WSL Command

Posted on 2022-11-07 | In Language

Windows Subsystem Linux (WSL)

Windows PowerShell 常用 WSL(2) command

目前 Windows 10 supports Ubuntu 18.04 LTS 和 Ubuntu 20.04 LTS

Install and Uninstall WSL (from Windows)

[@hucHowInstall2022] and [@hucHowUninstall2022]

Check WSL status (from Windows)

1
2
3
4
5
PS> wsl -l -v
PS> wsl --list --verbose 
  NAME            STATE           VERSION
* Ubuntu-18.04    Running         2
  Ubuntu-20.04    Running         2

可以看到 WSL distribution name (U18 or U20) 和 WSL version number (WSL1 or WSL2).

  • 目前正在執行 (running) 的 U18 WSL2 and U20 WSL2

  • 兩個 WSL 都是 WSL2 (version 2)

  • Default active 是 U18 WSL2, 因爲前面有 *.

    什麽是 default active? 就是在 “PS> bash” 從 PowerShell 切到 U18 WSL2, 但是仍然在同一個 directory.

Run/Stop WSL (from Windows)

Running: 簡單的方法是直接從 Windows Start Menu 打開 Ubuntu18 or Ubuntu20 icon,就可以把 Stopped WSL2 喚醒。

Stopped: 關掉 Ubuntu windows 不會馬上 Running -> Stopped. 但是等 30 秒就會 Stopped.

1
2
3
4
5
6
7
8
9
10
11
12
13
14
15
16
17
18
19
20
21
22
PS> wsl -l -v 
  NAME            STATE           VERSION
* Ubuntu-20.04    Running         2
  Ubuntu-18.04    Stopped         2
  
# 此時打開 Windows Start Menu 的 Ubuntu18
PS> wsl -l -v 
  NAME            STATE           VERSION
* Ubuntu-20.04    Running         2
  Ubuntu-18.04    Running         2
      
# 此時關掉 Windows Start Menu 的 Ubuntu18
PS> wsl -l -v 
  NAME            STATE           VERSION
* Ubuntu-20.04    Running         2
  Ubuntu-18.04    Running         2

# 等了 30 seconds
PS> wsl -l -v 
  NAME            STATE           VERSION
* Ubuntu-20.04    Running         2
  Ubuntu-18.04    Stopped         2
從 PowerShell 開關 WSL 的方法:

Running -> Stopped

1
PS> wsl --terminate <Distro>

全部 stopped

1
PS> wsl --shutdown

Stopped -> Running

1
PS> wsl --distribution <Distro>

Stopped -> Running the default WSL: wsl (or bash)

1
PS> wsl

PowerShell 和 Ubuntu WSL bash 切換 (Windows <-> Ubuntu)

1
2
3
4
5
6
PS> wsl (or bash)

/mnt/c/Users$ exit
logout

PS> wsl
  • (Windows) PowerShell 切到 (Default Ubuntu) bash: wsl (or bash)
  • (Ubuntu) bash 回到 PowerShell: exit
  • Caveat1: bash (or wsl) 會切到 default WSL.
  • Caveat2: 切換 PowerShell and bash 都是在同一個 directory. 對於需要用 Linux command 非常方便。

Set a Default Linux Distribution (from Windows)

1
2
PS> wsl -l -v
PS> wsl --setdefault <Distro>

實例如下:

1
2
3
4
5
6
7
8
9
10
PS> C:\Users\allen\OneDrivewsl -l -v
  NAME            STATE           VERSION
* Ubuntu-18.04    Running         2
  Ubuntu-20.04    Running         2

PS> wsl --setdefault Ubuntu-20.04
PS> wsl -l -v
NAME            STATE           VERSION
* Ubuntu-20.04    Running         2
  Ubuntu-18.04    Running         2

Switch between WSL1 and WSL2 (from Windows)

一般我們都用 WSL2:WSL2 是 WSL1 的更新版本,支持所有的 linux system call, 又快了 20%. 沒有什麽理由用 WSL1. Don’t do it!

1
2
PS> wsl -l -v
PS> wsl --set-version [Distro] [Version]

Ubuntu (WSL2) bash 常用 command

確認目前是在哪一個 WSL2 (from Ubuntu)

Ubuntu 20.04:

1
2
3
4
5
6
7
$ lsb_release -a

No LSB modules are available.
Distributor ID: Ubuntu
Description:    Ubuntu 20.04.5 LTS
Release:        20.04>
Codename:       focal

Ubuntu 18.04:

1
2
3
4
5
6
7
$ lsb_release -a

No LSB modules are available.
Distributor ID: Ubuntu
Description:    Ubuntu 18.04.6 LTS
Release:        18.04
Codename:       bionic

How To Upgrade Existing WSL/WSL2 Ubuntu 18.04 to 20.04

How To Upgrade Existing WSL/WSL2 Ubuntu 18.04 to 20.04 - NEXTOFWINDOWS.COM

password is axxxxxxz

1
2
3
sudo apt update
sudo apt list --upgradable
sudo apt upgrade

Then clean up package source and remove any unused packages.

U18/U20

1
2
3
4
5
$ sudo apt --purge autoremove
Reading package lists... Done
Building dependency tree
Reading state information... Done
0 upgraded, 0 newly installed, 0 to remove and 0 not upgraded.

Auto Upgrade to New Packages (Not recommend)

It’s important to install this update manager core package this will trick the system to think there is a new LTS available and allow you to do an in place upgrade.

1
2
3
sudo apt install update-manager-core
sudo do-release-upgrade
sudo do-release-upgrade -d
1
2
    $ conda install scikit-learn-intelex
    $ python -m sklearnex my_application.py

Install CUDA for AI

Reference: [@dkHowInstall2022]

  1. 更新win系统 to 2022H2

  2. Download Nvidia’s Windows driver (510.60.02) and CUDA (11.6) for graph card and support WSL! Download NVIDIA, GeForce, Quadro, and Tesla Drivers

  3. Install WSL2

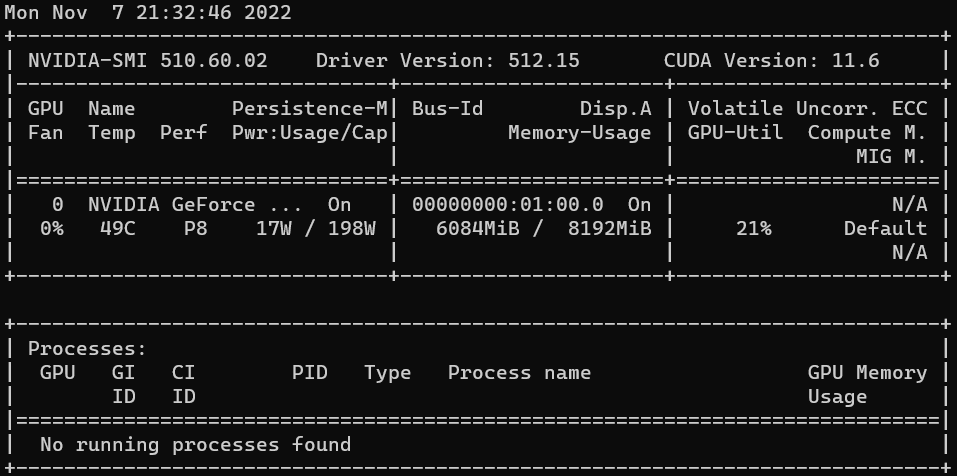
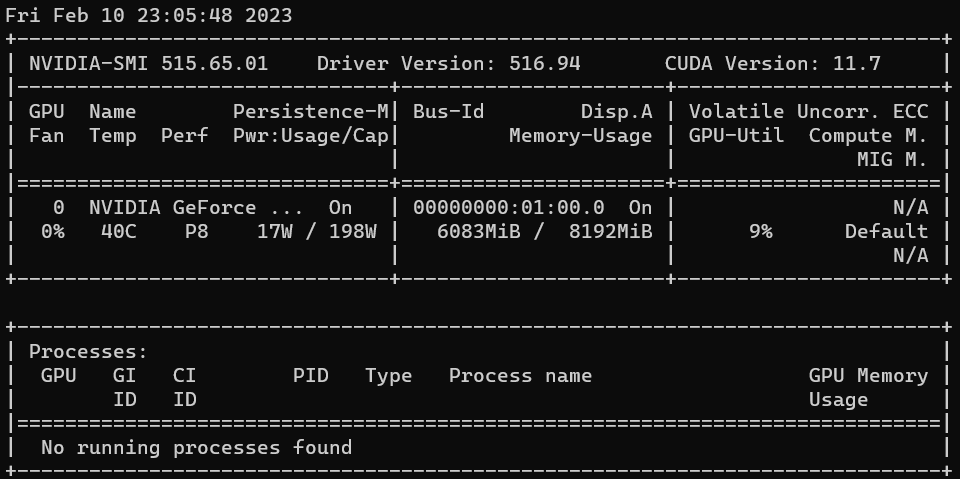
  4. Check if graph card is OK in WSL2: graphic driver (510.60.02) and CUDA (11.6)

    upgrade to driver 516.94, CUDA 11.7

1
$ nvidia-smi

image-20221107215455615

image-20230210230754445

  1. Install Anaconda (2022/10, Python 3.9)
1
2
$ wget https://repo.anaconda.com/archive/Anaconda3-2022.10-Linux-x86_64.sh
$ bash Anaconda3-2022.10-Linux-x86_64.sh

Clone environment jax and install jax. use the CPU version since not for serious computing!

1
2
3
4
(base) $ conda create -n jax --clone base
(base) $ conda activate jax
(jax) $ pip install --upgrade pip
(jax) $ pip install --upgrade "jax[cpu]"

Clone environment torch and install pytorch (use GPU!)

1
2
3
(base) $ conda create -n torch --clone base
(base) $ conda activate torch
(torch) $ conda install pytorch torchvision torchaudio pytorch-cuda=11.6 -c pytorch -c nvidia

Install cudnn (TBD! Nvidia sucks!)

  • Go to nvidia download website: [cuDNN Archive NVIDIA Developer](https://developer.nvidia.com/rdp/cudnn-archive).

image-20221107225432309

Try jax gpu on jax_gpu virtual environment.

PC -> use WSL -> jax cpu (OK), jax gpu (TBD)

Mac -> M1 version jax (NOK!) use miniforge3 (OK)

Compact the Ubuntu VM!

First find the location of the disk:

  1. PowerShell > diskpart
  2. DISKPART> Select vdisk file=c:\Users\allen\AppData\Local\Packages\CanonicalGroupLimited.Ubuntu20.04onWindows_79rhkp1fndgsc\LocalState\ext4.vhdx
  3. DISKPART> compact vdisk
  4. DISKPART> Select vdisk file=c:\Users\allen\AppData\Local\Packages\CanonicalGroupLimited.Ubuntu18.04onWindows_79rhkp1fndgsc\LocalState\ext4.vhdx
  5. DISKPART> compact vdisk
Read more »

如何避免 Softmax overflow or underflow

Posted on 2022-11-07 | In Language
VS Code 是 open programming environment
Read more »

Python Project Management - Testing

Posted on 2022-10-22 | In Language

[@liaoPythonImport2020] 指出 import 常常遇到的問題

[@loongProjectStructure2021] Python project structure 寫的非常好,本文直接引用作爲自己參考。

testing:

由於 Python 簡單易用,很多開始使用 Python 的人都是從一個 script 檔案開始,逐步形成多個 Python 檔案組成的程序。

在脫離 Python 幼幼班準備建立稍大型的專案的時候,學習如何組織化 Python 專案是一大要點。分成三個部分:

  1. 檔案放在同一個 directory 形成一個 package 打包。對應下面的簡單結構。
  2. 不同的 sub-packages 再用一個 (src) directory. 之後一起打包。對應下面的 src 結構的 src directory.
  3. Testing 非常重要,但是一般放在分開的 tests directory, 避免被打包。對應下面的 src 結構的 tests directory.

這裏討論 Testing.

Unittest

Pytest 的特點

  • 會自動辨識 tests directory, test_xxx.py, 以及 def test_xxx module!

  • 使用 assert 語法

  • 可以直接在 command window 執行,或是在 vs code 執行。

  • 如果在 command window 執行 python program, 例如 pytest:

    在 PC Windows 10 PowerShell (PS), 必須這樣設定 PYTHONPATH:

    1
     $env:PYTHONPATH = ".\src"
    

    在 Mac OS, 可以這樣設定 PYTHONPATH:

    1
     $export PYTHONPATH='./src'
    
  • 如果在 vs code 執行 python program, 有兩種設定方式

  1. 直接在 launch.json 設定如下。此處是相當于設定 PYTHONPATH = “./src” 也就是 VS Code {workspaceRoot/src} folder.
  2. 第二種方法是 VS code default 會 load {workspaceRoot}/.env. 也可以用 launch.json 的 envFile 設定 path (這裡也是 ./.env)
1
2
3
4
5
6
7
8
9
10
11
12
13
14
15
16
17
18
19
20
{
    // Use IntelliSense to learn about possible attributes.
    // Hover to view descriptions of existing attributes.
    // For more information, visit: https://go.microsoft.com/fwlink/?linkid=830387
    "version": "0.2.0",
    "configurations": [
        {
            "name": "Python: Current File",
            "type": "python",
            "request": "launch",
            "program": "${file}",
            "console": "integratedTerminal",
            "env": {"PYTHONPATH": "./src"},
            //"env": {"PYTHONPATH":"${workspaceRoot}/src"},  // same as "./src"
            //"envFile": "${workspaceRoot}/.env",
            //"python": "${command:python.interpreterPath}",
            "justMyCode": true
        }
    ]
}

.env file content 就只有一行:

1
PYTHONPATH=./src

好像第二種方法比較不會有問題?

phone_benchmark + pytest 爲例

首先看 tree structure:

1
2
3
4
5
6
7
8
9
10
11
12
13
14
15
phone_benchmark
├── data
│   ├── antutu.html
│   ├── geekbench.html
│   └── gfxbench.html
├── db
│   └── benchmark.db
├── src
│   └── phone_benchmark
│       ├── __init__.py
│       ├── gfxcrawler.py
│       └── gfxsql.py
└── tests
    ├── __init__.py
    └── test_gfxsql.py

src/phone_benchmark/gfxsql.py

先看 gfxsql.py 目的是輸入 gfxbench.html, parse and output to benchmark.db.

原則上每一個 function, 包含main, 都可以被測試。不過一般還是以主要的 function 爲主。

例如 parse_gfxbench_html().

1
2
3
4
5
6
7
8
9
10
11
12
13
14
15
16
17
18
19
20
21
22
23
24
25
26
27
28
29
30
31
32
33
34
35
36
37
38
39
40
41
42
43
44
45
46
47
48
49
50
51
52
53
54
55
56
57
58
59
60
61
62
63
64
65
66
67
68
69
70
71
72
73
74
75
76
77
78
79
80
81
82
import click
from bs4 import BeautifulSoup
import re

'''import sqlite3'''
import sqlite3

# process title to remove space and special characters including return for a legal filename
def process_title(title):
    '''replace space, hyfen, and other special characters with underscore using regular expression'''
    title = re.sub(r'[\r\n\t\s\(\)-/\:*?<>|]', '_', title)
    '''remove leading and continuous underscores'''
    title = re.sub(r'^_+', '', title)
    '''split the title by underscore and return the first element'''
    titleLst = title.split('_')
    return titleLst[0]

def parse_gfxbench_html(html):
    soup = BeautifulSoup(html, 'html.parser')
    '''Get title'''
    gfx_title = process_title( soup.title.string )
    '''extract the phone name'''
    phone_lst = []
    lst_all= soup.find_all('li', class_='name') 
    for item in lst_all:
        linkname = list(item.stripped_strings)
        phone_lst.append(linkname[0])
    '''extract the phone score'''
    score_lst = []
    fps_lst = []
    lst_all= soup.find_all('li', class_='points')
    for item in lst_all:
        linkname = list(item.stripped_strings)
        score_lst.append(linkname[0])
        '''extract the number from the string'''
        fps_lst.append(float(re.findall(r'\d+\.?\d*', linkname[2])[0]))
    '''extract the gpu name'''
    gpu_lst = []
    lst_all= soup.find_all('li', class_='gpu-info')
    for item in lst_all:
        linkname = list(item.stripped_strings)
        '''remove the trademark symbol'''
        gpu_lst.append(linkname[0].replace('™', ''))
    '''extract the api name'''
    api_lst = []
    lst_all= soup.find_all('li', class_='api')
    for item in lst_all:
        linkname = list(item.stripped_strings)
        api_lst.append(linkname[0])
    '''extract date'''
    date_lst = []
    lst_all= soup.find_all('li', class_='date')
    for item in lst_all:
        linkname = list(item.stripped_strings)
        date_lst.append(linkname[0])    
    '''clean the gfx data and convert to database format'''
    (gfx_field, gfx_records) = clean_gfx_data(phone_lst, gpu_lst, api_lst, date_lst, score_lst, fps_lst)
    return (gfx_title, gfx_field, gfx_records)

def clean_gfx_data(phone_lst, gpu_lst, api_lst, date_lst, score_lst, fps_lst):
    '''unify the gfx data format'''
    gfx_itemname = ['Phone', 'GPU', 'API', 'DATE', 'SCORE', 'FPS']
    gfx_item = []
    for i in range(len(phone_lst)):
        gfx_item.append([phone_lst[i], gpu_lst[i], api_lst[i], date_lst[i], score_lst[i], fps_lst[i]])
    return (gfx_itemname, gfx_item)
    

@click.command()
def main():
    with open(r'./data/gfxbench.html','r',encoding="utf-8") as f:
        gfxbench_html = f.read()
    f.close()

    (gfx_title, gfx_field, gfx_records) = parse_gfxbench_html(gfxbench_html)

    db_table = gfx_title
    create_db_table(db_table)
    click.echo(gfx_title)

if __name__ == '__main__':
    main()

tests/test_gfxsql.py

我們看 test_gfxsql.py

1
2
3
4
5
6
7
8
9
10
11
12
13
14
15
16
17
18
19
20
21
from click.testing import CliRunner
from phone_benchmark import gfxsql


def test_main():
    runner = CliRunner()
    result = runner.invoke(gfxsql.main)
    assert 'GFXBench' in result.output

def test_parse_gfxbench_html():
    with open(r'./data/gfxbench.html','r',encoding="utf-8") as f:
        gfxbench_html = f.read()
    f.close()
    (gfx_title, gfx_field, gfx_records) = gfxsql.parse_gfxbench_html(gfxbench_html)
    assert gfx_title == 'GFXBench'
    assert gfx_field == ['Phone', 'GPU', 'API', 'DATE', 'SCORE', 'FPS']
    assert len(gfx_records) == 20

if __name__ == '__main__':
    test_main()
    test_parse_gfxbench_html()

直接在 command window 執行 pytest : evoke tests\test_gfxsql.py

其中的兩項 test: test_main() and test_parse_gfxbench_html()

1
2
3
4
5
6
7
8
(base) PS C:\Users\allen\OneDrive\ml_code\work\phone_benchmark_prj> pytest
========================= test session starts =============================
platform win32 -- Python 3.8.5, pytest-6.1.1, py-1.9.0, pluggy-0.13.1
rootdir: C:\Users\allen\OneDrive\ml_code\work\phone_benchmark_prj
collected 2 items

tests\test_gfxsql.py ..                                                                                          [100%]
========================= 2 passed, 0 warning in 0.33s ======================
Read more »

Web Crawler or Scraper

Posted on 2022-10-16 | In AI

Citation

[@seleniumWriteYour2022] : official website example

[@allenSelenium4New2021] : compare selenium 3 and selenium 4

[@tailemiWebScraper2021] : web scraper 教學

Abstract

website -> (crawl/scrape -> unstructured data -> parse -> (database) -> presentation)

是否有機會讓 database left shift? (1) 分析 unstructured data (with date and meta-data of course); (2) 甚至可以 crawl/scrape data automatically.

剛好找到一個例子:[ImportFromWeb Web scraping in Google Sheets - Google Workspace Marketplace](https://workspace.google.com/marketplace/app/importfromweb_web_scraping_in_google_she/278587576794)

使用 excel 作爲 front-end. 利用 data crawler scrapes web site 可以自動 update 資料。

Why left shift? (1) keep raw data for future analysis/verification; (2) 可以 present date or time sequence evolution; (3) for missing data, 可以主動出擊 (active search).

Introduction

AI 世界, data is the king. Data 從何而來?(1) 有人整理好的 public dataset 或是花錢買或收集的 private dataset; (2) 從 Internet 爬 (crawl) 或抓 (scrape) 出來再整理。

爬或抓是第一步;整理是第二步。本文聚焦在第一步。

分析:

selenium (Python) 3.x or 4.x

scraper (GUI)

整理: BeautifulSoup

Reference

Read more »

Dynamic Data Crawler

Posted on 2022-10-14 | In AI

Introduction

下一步想要用 Copilot 做幾件事

  1. 寫一個 data crawler 從 GFXbench 抓 GPU 相關資料

  2. 抓來的 html 用 BeautifulSoup parsing 需要的 content

  3. BeatifulSoup parsed content 再用 regular expression 取出 structured data

  4. Structured data 放入 database

  5. database 可以 query and output formatted data

當然是用 Python 做爲 programming language

Step 1 & 2: Data Crawler and HTML Parsing

參考:[@weiyuanDataCrawler2017] and [@oxxoWebCrawler2021]

資料爬蟲是用在沒有以檔案或是 API 釋出資料集的情況下。這個時候就只能捲起袖子,自己想要的資料自己爬!

第一類比較簡單,是靜態網頁

動態網頁

傳統的 Web 應用允許使用者端填寫表單(form),當送出表單時就向網頁伺服器傳送一個請求。伺服器接收並處理傳來的表單,然後送回一個新的網頁,但這個做法浪費了許多頻寬,因為在前後兩個頁面中的大部分HTML碼往往是相同的。由於每次應用的溝通都需要向伺服器傳送請求,應用的回應時間依賴於伺服器的回應時間。這導致了使用者介面的回應比本機應用慢得多。

動態網頁有別於靜態網頁產生資料的方式。靜態網頁是透過每一次使用者請求,後端會產生一次網頁回傳,所以請求與回傳是一對一的,有些人把他們稱為同步。在動態網頁的話,是透過 Ajax 的技術,來完成非同步的資料傳輸。換句話說,就是在網頁上,任何時間點都可以發送請求給後端,後端只回傳資料,而不是回傳整個網頁。這樣一來,就不是一對一的關係,在處理資料上就會比較麻煩。

AJAX應用可以僅向伺服器傳送並取回必須的資料,並在客戶端採用JavaScript處理來自伺服器的回應。因為在伺服器和瀏覽器之間交換的資料大量減少,伺服器回應更快了。同時,很多的處理工作可以在發出請求的客戶端機器上完成,因此Web伺服器的負荷也減少了,如下圖。整的流程更複雜,不過後端還是可以用 beautifulsoup 處理。

所以我們換個角度,原本是模擬瀏覽器的動作,現在我們直接模擬人的操作。

這次使用 Selenium 4.x (注意和 reference 使用 3.x 語法不同) 實作 Data Crawler,Selenium 主要是拿來模擬瀏覽器行為的工具,而我們也利用的功能,模擬使用者瀏覽資料的過程取得資料,進一步利用 beautifulsoup 將原始資料進行爬梳。
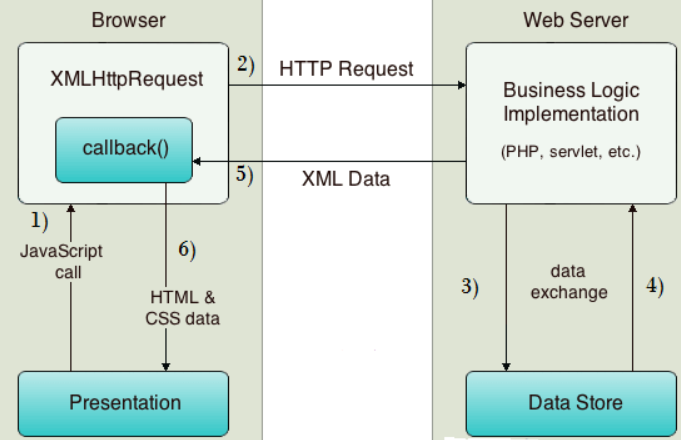
image-20221014224918077

模擬 Request

先從 selenium website download browser 的 driver. 這裏選擇 Chrome driver. 測試碼如下。

  1. 先啓動 Chrome webdriver
  2. 使用 get, request html from https://www.selenium.dev/selenium/web/web-form.html.
1
2
3
4
5
6
7
8
9
10
11
12
13
14
15
16
17
18
19
20
21
22
23
24
25
26
27
from selenium.webdriver.chrome.service import Service
from selenium import webdriver
from selenium.webdriver.common.by import By


def test_eight_components():
    service = Service(executable_path = "C:\Users\allen\OneDrive\ml_code\work\chromedriver.exe")
    driver = webdriver.Chrome(service=service)
    
    driver.get("https://www.selenium.dev/selenium/web/web-form.html")

    title = driver.title
    assert title == "Web form"

    driver.implicitly_wait(0.5)

    text_box = driver.find_element(by=By.NAME, value="my-text") # text_box: WebElement
    submit_button = driver.find_element(by=By.CSS_SELECTOR, value="button") # WebElement

    text_box.send_keys("Selenium")
    submit_button.click()

    message = driver.find_element(by=By.ID, value="message")
    value = message.text
    assert value == "Received!"

    driver.quit()

https://www.selenium.dev/selenium/web/web-form.html 的網頁如下圖:

  1. 一般先 get title.
  2. 再來是 waiting strategy: “Synchronizing the code with the current state of the browser is one of the biggest challenges with Selenium, and doing it well is an advanced topic.” 不過我們基本就用 try-and-error 先設定 0.5 秒。
  3. **dynamic 就是和頁面互動: **
    • 例如頁面上有 text box (e.g. Text input, Password, Textarea), menu (e.g. Dropdown, Color picker, Date picker), check box (e.g. checkbox, radio), button (submit), etc.
    • 一般用 find_element(by=BY.NAME) 或是 BY.ID 找到對應的 “WebElement”。不過 NAME, ID 都要事先知道。
    • 設定 WebElement (e.g. text, click). 一般最後是用 click() 送出 request.
    • 注意此時不用再 request and get. 理論上 webpage 會自動 update.
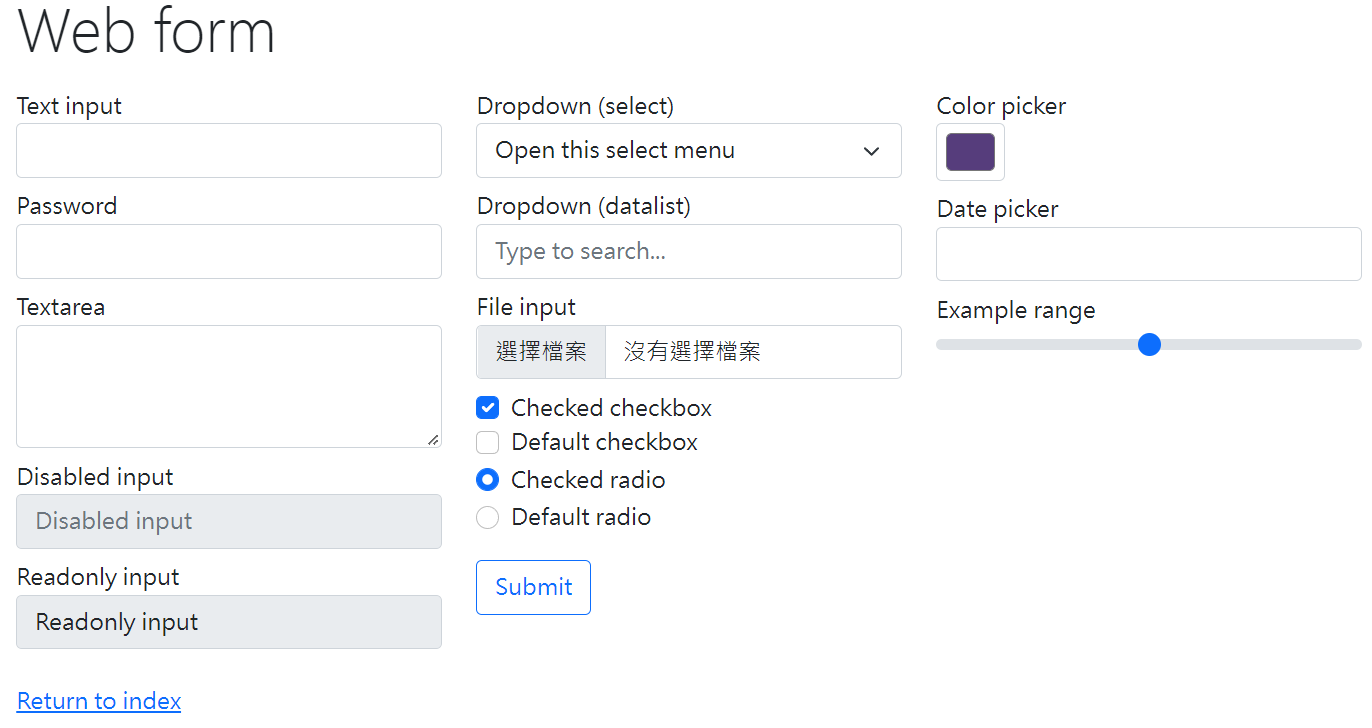
image-20221014232232210

Selenium4 新特性

Selenium4 至少需要 Python 3.7 或更高版本。 Python 3.6 (含) 之前的版本只能 install selenium3

Selenium 3 & 4 find_element 的比較

最常用的是 by_name, by_css_selector, by_id (Selenium 3), or By.NAME, By.CSS_SELECTOR, By.ID.

Selenium 3:

1
2
3
4
5
6
7
8
driver.find_element_by_class_name("className")
driver.find_element_by_css_selector(".className")
driver.find_element_by_id("elementId")
driver.find_element_by_link_text("linkText")
driver.find_element_by_name("elementName")
driver.find_element_by_partial_link_text("partialText")
driver.find_element_by_tag_name("elementTagName")
driver.find_element_by_xpath("xpath")

Selenium 4:

1
2
3
4
5
6
7
8
9
from selenium.webdriver.common.by import By
driver.find_element(By.CLASS_NAME,"xx")
driver.find_element(By.CSS_SELECTOR,"xx")
driver.find_element(By.ID,"xx")
driver.find_element(By.LINK_TEXT,"xx")
driver.find_element(By.NAME,"xx")
driver.find_element(By.PARITIAL_LINK_TEXT,"xx")
driver.find_element(By.TAG_NAME,"xx")
driver.find_element(By.XPATH,"xx")

如果是多個 elements, 使用 find_elements instead of find_element.

Selenium 4: executable_path 更新成 service (minor)

Selenium 3:

1
2
from selenium import webdriver
driver = webdriver.Chrome(executable_path=CHROMEDRIVER_PATH)  # provide the chrome path

Selenium 4:

1
2
3
4
from selenium import webdriver
from selenium.webdriver.chrome.service import Service as ChromeService
service = ChromeService(executable_path=CHROMEDRIVER_PATH)
driver = webdriver.Chrome(service=service)

如果是多個 elements, 使用 find_elements instead of find_element.

How about ui select?

driver.close or driver.quit

  • > driver.close() command will only close the browser window which is in focus, out of all the windows opened
    • > If the current focus is on the main/defect window, driver.close() will close the main/default window
    • > If you have switched to a popup window or new tab window from the main/default window, driver.close() will close the current focused child window
  • > driver.quit() command will close all the browser windows which are opened irrespective of their count (including the default and child windows)

How to pass the final html?

html = driver.page_source

GFXBench Dynamics Crawler

[@tutorialspointHowSelect2021] : tutorial on dropdown menu, can be used for GFXBench test options selection.

Reference

Read more »

Low light math

Posted on 2022-10-10
  1. Normal communication in a noisy channel –> MLE problem, the SNR is well defined assuming ML estimation (假設 input source distribution 是 50/50 because we don’t know prior!!!!) for the BER!
  2. Machine learning –> 先學習到 input distribution –> 使用 MAP for the BER 所以比較好,因為如果 input source only send 1, no 0. 不管 noise 有多大,就直接猜 1! 仍然可以得到很好的結果。就是有 (correct) prior distribution.
  3. What about the input distribution is purely random? 那就代表學不到東西!against 學習的基本假設。至少 input distribution 的 noise 可以遠小於 channel noise (from dimension reduction or manifold leanring perspective) ? 所以 low light 還是可以得分!
Read more »
1 … 15 16 17 … 25
Allen Lu (from John Doe)

Allen Lu (from John Doe)

243 posts
18 categories
140 tags
RSS
© 2024 Allen Lu (from John Doe)
Powered by Jekyll
Theme - NexT.Muse